Help needed: Multiple Distance Sensor Project

Seeking help from the Hive Mind,

This one’s time urgent because we need to be installed in 2 weeks - so all ideas much appreciated!

Building a project with 17 distance sensors (currently HR SC04 Ultrasonic sensors) installed on a 3m high concentric floating ceiling, facing towards the floor. The floating ceiling consists of 2 concentric circles, 1x 8m diameter, and 1x 4 m diameter inside. The sensors are to be cabled from the centre outwards, think spider web of sensor cables, 12x 4m length, 4x 2m length. Photos attached.

The intention is that people who walk/dance under these sensors trigger sound samples and audio effects (arduino Mega>MIDI over serial>Ableton live 9). Arduino code below.

Some sensors are reading binary triggered/not trigger within the distance range, and sending MIDI NoteOnOff messages, which trigger banks of one-shot sound samples.

The rest are reading variable distances (person standing under the sensor, crouching down, and reaching up), and sending MIDI Control Change messages to Ableton to control audio effects, spatial panning, volume etc.

At the moment the ultrasonic sensors are triggering reliably over a distance only with certain materials (e.g. dense with a 90degree angle to return to trigger’s echo to sensor), which is expected but not ideal for triggering sensors when people walk underneath.

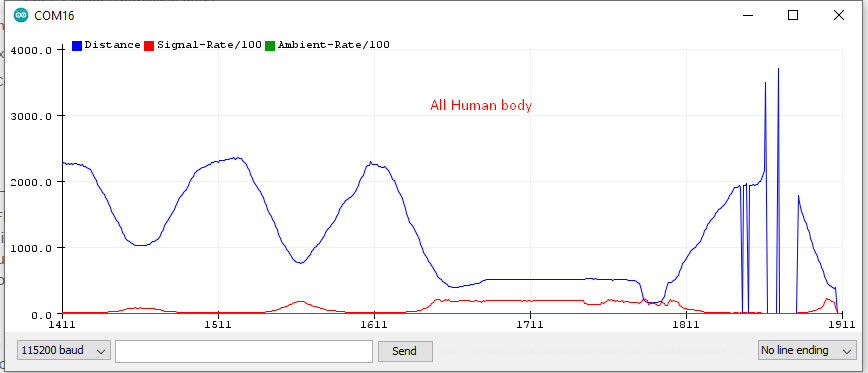
Looking at swapping these out for infrared sensors to increase reliability of sensor trigger. We’ve been suggested to consider the ‘Sharp GP2Y0A710K Distance Sensor (100-550cm) SEN0085’ sensor, which I’ve been told will be more reliable for detecting humans underneath. My question is, will the variable range be reliable/smooth enough to control MIDI control messages?

Or are there any other sensors we should be considering for this desired effect?

Arduino code below:

//3pin library
#include "NewPing.h"

#define TOTAL_NUMBER_OF_SENSORS 3           //Total Number of sonar sensors. YOU MUST CHANGE THIS IF YOU ADD MORE SENSORS
#define NUMBER_OF_NOTE_SENSORS 1            //Num of NOTE sensors. YOU MUST CHANGE THIS IF YOU WANT TO CHANGE THE NUMBER OF NOTE SENSORS (We use this and TOTAL_NUMBER_OF_SENSORS to know how many controllers we have)
#define NUMBER_OF_CONTROLLER_SENSORS TOTAL_NUMBER_OF_SENSORS - NUMBER_OF_NOTE_SENSORS   //Calculated from the previous two

#define PIN_FOR_SENSOR_1 2
#define PIN_FOR_SENSOR_2 3
#define PIN_FOR_SENSOR_3 4

#define MAX_DISTANCE 400                    // The upper limit to what we want to sense
#define FLOOR_DISTANCE 200                  // Anything above this distance is considered to be the floor. YOU MUST CHANGE THIS IF THE DISTANCE BETWEEN THE SENSORS AND FLOORS CHANGE

//trigger first, echo second
NewPing sonar[TOTAL_NUMBER_OF_SENSORS] = {      // Sensor object array. IF ADDED MORE 'PIN_FOR_SENSOR_X' ENTRIES YOU MUST ADD THE SAME HERE
    NewPing (PIN_FOR_SENSOR_1, PIN_FOR_SENSOR_1, MAX_DISTANCE),             // Each sensor's trigger pin, echo pin, and max distance to ping.
    NewPing (PIN_FOR_SENSOR_2, PIN_FOR_SENSOR_2, MAX_DISTANCE),
    NewPing (PIN_FOR_SENSOR_3, PIN_FOR_SENSOR_3, MAX_DISTANCE),
};

uint8_t MIDI_CC = 0b10110000;               // 176 = Control Change and Midi Channel 1
uint8_t MIDI_NOTE = 0b10010001;             // 145  = Note On and Midi Channel 2 (second nibble is Channel)

/*
 * Note sensor things start
 */
uint8_t notes[NUMBER_OF_NOTE_SENSORS][4] = {                    //4 is for the number of samples in each bank
    {61, 62, 63, 64},                               //We need a line here for each NUMBER_OF_NOTE_SENSORS
//    {71,72,73,74},
//    {81,82,83,84},
};
int noteToPlayForSensor[NUMBER_OF_NOTE_SENSORS] = {0};              //num of sensors that are noteOnOffs, everything starts at 0
bool noteIsPlayingForSensor[NUMBER_OF_NOTE_SENSORS] = {false};      //A way to keep track of whether a note is playing
/*
 * Note sensor things end
 */

/*
 * Controller sensor things start
 */
uint8_t controller[NUMBER_OF_CONTROLLER_SENSORS] = {21, 23};    //Each sensor output is tied to a controller. YOU MUST ADD MORE NUMBERS IF YOU HAVE MORE CONTROLLERS
int previousControllerDistance[NUMBER_OF_CONTROLLER_SENSORS] = {0};
int greaterThanFloorDistanceCounter[NUMBER_OF_CONTROLLER_SENSORS] = {0};
/*
 * Controller sensor things end
 */

void sendMIDI(uint8_t statusByte, uint8_t data1, uint8_t data2) {
    Serial.write(statusByte);
    Serial.write(data1);
    Serial.write(data2);

//    Serial.print(statusByte);
//    Serial.print(" ");
//    Serial.print(data1);
//    Serial.print(" ");
//    Serial.println(data2);
}

void setup() {
    Serial.begin(115200);
}

void loop() {
    for (uint8_t currentSensor = 0; currentSensor < TOTAL_NUMBER_OF_SENSORS; ++currentSensor) {
        delay(50);

        int distance = sonar[currentSensor].ping_cm();

        if (currentSensor < NUMBER_OF_NOTE_SENSORS) { //if it's a note sensor
            if (distance >= FLOOR_DISTANCE) { // if ping distance is greater or equal to floor
                if (noteIsPlayingForSensor[currentSensor]) { //if note was playing
                    sendMIDI(MIDI_NOTE, notes[currentSensor][noteToPlayForSensor[currentSensor]], 0); //Send noteOff
                    noteToPlayForSensor[currentSensor] = (noteToPlayForSensor[currentSensor] + 1) % 4; // set the next note to play (modulo is num of samples in each bank)
                    noteIsPlayingForSensor[currentSensor] = false; // set noteIsPlayingForSensor to false
                }
            }
            else if (distance <= 0) { //distance is 0 if we get no ping back
                // do nothing
            }
            else {
                if (noteIsPlayingForSensor[currentSensor]) { //we check the current sensor state here since the last ping
                    //do nothing because a person is still standing underneath
                } else {
                    sendMIDI(MIDI_NOTE, notes[currentSensor][noteToPlayForSensor[currentSensor]], 127);
                    noteIsPlayingForSensor[currentSensor] = true;
                }

            }
        }
        else { //else it's not a note sensor so is a controller sensor
            uint8_t currentControllerSensor = currentSensor - NUMBER_OF_NOTE_SENSORS;           //We can't use currentSensor because there are note sensors first. So we subtract the number of note sensors 
            int mappedDistance = map(distance, 50, FLOOR_DISTANCE, 127, 0);                 //We need to map our numbers between 127 and 0
            int constrainedMappedDistance = constrain(mappedDistance, 0, 127);    //Mapping still allows numbers beyond what we need, so we constrain

            //if distance is less than floor
                //store this distance
                //set greaterThanFloorDistanceCounter to 0
                //send this distance over midi
            //else
                //increase greaterThanFloorDistanceCounter by 1
                //if greaterThanFloorDistanceCounter > 4
                    //send floor distance over midi
                //else send previous stored value
            if (distance < FLOOR_DISTANCE){
                previousControllerDistance[currentControllerSensor] = constrainedMappedDistance;
                greaterThanFloorDistanceCounter[currentControllerSensor] = 0;
                sendMIDI(MIDI_CC, controller[currentControllerSensor], constrainedMappedDistance); //send the constrainedMappedDistances
            } else {
                greaterThanFloorDistanceCounter[currentControllerSensor] = greaterThanFloorDistanceCounter[currentControllerSensor] + 1;
                if (greaterThanFloorDistanceCounter[currentControllerSensor] > 3){
                    sendMIDI(MIDI_CC, controller[currentControllerSensor], 0);
                } else {
                    sendMIDI(MIDI_CC, controller[currentControllerSensor], previousControllerDistance[currentControllerSensor]); //send the constrainedMappedDistances
                }
            }
        }
    }
}
2 Likes

Hi Gwen,

Thanks for making a post! The photos and code really help out. Whenever I’m troubleshooting something I always find it’s best to strip it right back to basics to be able to isolate one issue at atime.
The NewPing library is a good choice (I really like the single pin mode) for running HC-SR04 sensors.

I’ve just setup some test code with an HC-SR04 sensor and in my quick testing I was able to get reliable sensing of a person up to about 2m (in line with your results). We don’t have any of the new sensors you’ve ordered, so I used a ToF sensor instead:

As you can see there is a huge difference in the quality of reading off a human between the two (this is raw data, with filtering it would be even better).

HC-SR04 (in cm)

Sparkfun VL53L1X (in mm)

The ToF sensor is 10x the price, but if you’re trying to do pitch control based on distance measured at distances of 1-3m you will need the ±1mm accuracy of a ToF or similar light based sensor. Since you’re already running a redBoard these specific sensors would be very easy to implement.

For reference, here’s my test code (just slightly modified examples from their respective libraries. For the HC-SR04:

// ---------------------------------------------------------------------------
// Example NewPing library sketch that does a ping about 20 times per second.
// ---------------------------------------------------------------------------

#include <NewPing.h>

#define TRIGGER_PIN  12  // Arduino pin tied to trigger pin on the ultrasonic sensor.
#define ECHO_PIN     12  // Arduino pin tied to echo pin on the ultrasonic sensor.
#define MAX_DISTANCE 250 // Maximum distance we want to ping for (in centimeters). Maximum sensor distance is rated at 400-500cm.

NewPing sonar(TRIGGER_PIN, ECHO_PIN, MAX_DISTANCE); // NewPing setup of pins and maximum distance.

void setup() {
  Serial.begin(115200); // Open serial monitor at 115200 baud to see ping results.
  Serial.print("Distace(cm)");
}

void loop() {
  delay(50);                     // Wait 50ms between pings (about 20 pings/sec). 29ms should be the shortest delay between pings.
  Serial.print("Distace(cm):");
  Serial.println(sonar.ping_cm()); // Send ping, get distance in cm and print result (0 = outside set distance range)
  //Serial.println("cm");
}

And the ToF sensor:

/*
 Reading distance from the laser based VL53L1X
 By: Armin Joachimsmeyer
 for SparkFun Electronics
 Date: February 20th, 2020
 License: This code is public domain but you buy me a beer if you use this and we meet someday (Beerware license).

 SparkFun labored with love to create this code. Feel like supporting open source hardware?
 Buy a board from SparkFun! https://www.sparkfun.com/products/14667

 This example prints the distance to an object to the Arduino Serial Plotter and generates a tone depending on distance.

 Are you getting weird readings? Be sure the vacuum tape has been removed from the sensor.
 */

#include <Wire.h>
#include "SparkFun_VL53L1X.h" //Click here to get the library: http://librarymanager/All#SparkFun_VL53L1X

//Optional interrupt and shutdown pins.
#define SHUTDOWN_PIN 2
#define INTERRUPT_PIN 3
#define TONE_PIN 11

SFEVL53L1X distanceSensor;
//Uncomment the following line to use the optional shutdown and interrupt pins.
//SFEVL53L1X distanceSensor(Wire, SHUTDOWN_PIN, INTERRUPT_PIN);

void setup(void)
{
  Wire.begin();

  // initialize the digital pin as an output.
  pinMode(LED_BUILTIN, OUTPUT);
  Serial.begin(115200);
  while (!Serial)
    ; //delay for Leonardo
  // Just to know which program is running on my Arduino
  Serial.println(F("START " __FILE__));

#if !defined(ESP32) && !defined(ARDUINO_SAM_DUE) && !defined(__SAM3X8E__)
  // test beep for the connected speaker
  tone(TONE_PIN, 1000, 100);
  delay(200);
#endif

  if (distanceSensor.begin() != 0) //Begin returns 0 on a good init
  {
    Serial.println("Sensor failed to begin. Please check wiring. Freezing...");
    while (1)
      ;
  }
  Serial.println("Sensor online!");

  // Short mode max distance is limited to 1.3 m but has a better ambient immunity.
  // Above 1.3 meter error 4 is thrown (wrap around).
  //distanceSensor.setDistanceModeShort();
  distanceSensor.setDistanceModeLong(); // default

  // Print Legend
  Serial.println("Distance Signal-Rate/100 Ambient-Rate/100");

  /*
     * The minimum timing budget is 20 ms for the short distance mode and 33 ms for the medium and long distance modes.
     * Predefined values = 15, 20, 33, 50, 100(default), 200, 500.
     * This function must be called after SetDistanceMode.
     */
  distanceSensor.setTimingBudgetInMs(100);

  // measure periodically. Intermeasurement period must be >/= timing budget.
  distanceSensor.setIntermeasurementPeriod(100);
  distanceSensor.startRanging(); // Start once
}

void loop(void)
{
  while (!distanceSensor.checkForDataReady())
  {
    delay(1);
  }
  byte rangeStatus = distanceSensor.getRangeStatus();
  unsigned int distance = distanceSensor.getDistance(); //Get the result of the measurement from the sensor
  distanceSensor.clearInterrupt();

  /*
     * With signed int we get overflow at short distances.
     * With unsigned we get an overflow below around 2.5 cm.
     */
  unsigned int tSignalRate = distanceSensor.getSignalRate();
  unsigned int tAmbientRate = distanceSensor.getAmbientRate();

  if (rangeStatus == 0)
  {
#if !defined(ESP32) && !defined(ARDUINO_SAM_DUE) && !defined(__SAM3X8E__)
    tone(11, distance + 500);
#endif
  }
  else
  {
    // if tAmbientRate > tSignalRate we likely get a signal fail error condition
    // in Distance mode short we get error 4 (out of bounds) or 7 (wrap around) if the distance is greater than 1.3 meter.
    distance = rangeStatus;
#if !defined(ESP32) && !defined(ARDUINO_SAM_DUE) && !defined(__SAM3X8E__)
    noTone(11);
#endif
  }

  Serial.print(distance);
  Serial.print(' ');
  Serial.print(tSignalRate / 100);
  Serial.print(' ');
  Serial.println(tAmbientRate / 100);
}

And here is my quick and dirty setup:

Regards,
Oliver
Support | Core Electronics

2 Likes

Thanks Oliver for the quick testing and sharing of results!

Based on your results, we’ll try swap out the Sharp sensors for the Sparkfun ToFs as, logistically, they seem to be partly in stock and otherwise likely faster for the remaining stock.

Cheers,
Gwen

2 Likes

Hey Oliver and Team,

Do you guys know how to program the Field of a view down to 15 degrees?

I’m currently using the Pololu library for arduino, as it provided the most reliable manual assigning of the 16x i2c slave devices were using, but I can’t find any FoV programming capability inside.

I can find reference to it existing in the API, but not sure how to implement?

Any ideas?

Thanks!
Gwen

6Oct_NewSensorsWithKillSwitch 2.zip (3.2 KB)

1 Like

Hey Gwen,

Can you please put the current code you’re using up in the forum. There are a few libraries on GitHub in reference to adjusting the FoV of these sensors and information on pages 13 and 14 of the datasheet below that may be helpful to adjust the (apparent) FoV of the sensor itself to the minimum of 15° I’ve linked the PDF for you below. Although, for the particular Sparkfun board there may be some other implementations of similar code.

Bryce
Core Electronics | Support

1 Like
#include <Wire.h>
#include <VL53L1X.h>

#define TOTAL_NUMBER_OF_SENSORS 4           //Total Number of sonar sensors. YOU MUST CHANGE THIS IF YOU ADD MORE SENSORS
#define NUMBER_OF_KILL_SENSORS 1
#define NUMBER_OF_NOTE_SENSORS 1            //Num of NOTE sensors. YOU MUST CHANGE THIS IF YOU WANT TO CHANGE THE NUMBER OF NOTE SENSORS (We use this and TOTAL_NUMBER_OF_SENSORS to know how many controllers we have)
#define NUMBER_OF_CONTROLLER_SENSORS TOTAL_NUMBER_OF_SENSORS - NUMBER_OF_NOTE_SENSORS - NUMBER_OF_KILL_SENSORS   //Calculated from the previous

#define MAX_DISTANCE 5000                    // The upper limit to what we want to sense
#define FLOOR_DISTANCE 2700                  // Anything above this distance is considered to be the floor. YOU MUST CHANGE THIS IF THE DISTANCE BETWEEN THE SENSORS AND FLOORS CHANGE

//trigger first, echo second
VL53L1X sensors[TOTAL_NUMBER_OF_SENSORS] = {
  VL53L1X (), 
  VL53L1X (),
  VL53L1X (),
  VL53L1X (),
};

uint8_t pins[TOTAL_NUMBER_OF_SENSORS] = {
  4, 5, 6, 7
};

uint8_t addresses[TOTAL_NUMBER_OF_SENSORS] = {
  22, 43, 54, 65
};

uint8_t MIDI_CC = 0b10110000;               // 176 = Control Change and Midi Channel 1
uint8_t MIDI_NOTE = 0b10010001;             // 145  = Note On and Midi Channel 2 (second nibble is Channel)

/*
   Kill sensor things start
*/
uint8_t killSensorCount = 1;                // We start it at 0.
uint8_t killSensorTriggerNumber = 1;        // We kill every 4.
/*
   Kill sensor things end
*/

/*
   Note sensor things start
*/
uint8_t notes[NUMBER_OF_NOTE_SENSORS][4] = {                    //4 is for the number of samples in each bank
  {61, 62, 63, 64},                               //We need a line here for each NUMBER_OF_NOTE_SENSORS
  //    {71,72,73,74},
  //    {81,82,83,84},
};
int noteToPlayForSensor[NUMBER_OF_NOTE_SENSORS] = {0};              //num of sensors that are noteOnOffs, everything starts at 0
bool noteIsPlayingForSensor[NUMBER_OF_NOTE_SENSORS] = {false};      //A way to keep track of whether a note is playing
/*
   Note sensor things end
*/

/*
   Controller sensor things start
*/
uint8_t controller[NUMBER_OF_CONTROLLER_SENSORS] = {21, 22};    //Each sensor output is tied to a controller. YOU MUST ADD MORE NUMBERS IF YOU HAVE MORE CONTROLLERS
int previousControllerDistance[NUMBER_OF_CONTROLLER_SENSORS] = {0};
int greaterThanFloorDistanceCounter[NUMBER_OF_CONTROLLER_SENSORS] = {0};
/*
   Controller sensor things end
*/

bool killSensorON = false;


void sendMIDI(uint8_t statusByte, uint8_t data1, uint8_t data2) {
    Serial.write(statusByte);
    Serial.write(data1);
    Serial.write(data2);
  
  
//    Serial.print(statusByte);
//    Serial.print(" ");
//    Serial.print(data1);
//    Serial.print(" ");
//    Serial.println(data2);
}

void setup()
{
  for (int i = 0; i < TOTAL_NUMBER_OF_SENSORS; ++i) {
    pinMode(pins[i], OUTPUT);
    digitalWrite(pins[i], LOW);
  }

  delay(50);
  Wire.begin();
  Wire.beginTransmission(0x29);
  Serial.begin (115200);
//  Serial.println("Hell?");


  for (int i = 0; i < TOTAL_NUMBER_OF_SENSORS; ++i) {
    digitalWrite(pins[i], HIGH);
    delay(150);
    sensors[i].init();
    delay(100);
    sensors[i].setAddress((uint8_t)addresses[i]);
  }

  for (int i = 0; i < TOTAL_NUMBER_OF_SENSORS; ++i) {
    sensors[i].setDistanceMode(VL53L1X::Long);
    sensors[i].setMeasurementTimingBudget(500);
    sensors[i].startContinuous(50);
    sensors[i].setTimeout(100);
  }
  delay(150);
  
//  Serial.println("addresses set");
//  Serial.println ("I2C scanner. Scanning ...");
  
  byte count = 0;

  for (byte i = 1; i < 120; i++)
  {
    Wire.beginTransmission (i);
    if (Wire.endTransmission () == 0)
    {
//      Serial.print ("Found address: ");
//      Serial.print (i, DEC);
//      Serial.print (" (0x");
//      Serial.print (i, HEX);
//      Serial.println (")");
//      count++;
//      delay (1);  // maybe unneeded?
    } // end of good response
  } // end of for loop
//  Serial.println ("Done.");
//  Serial.print ("Found ");
//  Serial.print (count, DEC);
//  Serial.println (" device(s).");

} // end setup


void loop() {


  for (uint8_t currentSensor = 0; currentSensor < TOTAL_NUMBER_OF_SENSORS; ++currentSensor) {

    delay(50);

    int distance = sensors[currentSensor].read();
//    Serial.print("Sensor ");
//    Serial.print(currentSensor);
//    Serial.print(" ");
//    Serial.println(distance);

    //kill switch
    if (currentSensor == 0) {                                                       //If it's 0, it's the kill sensor
      if (distance >= 100) {                                           // if ping distance is greater or equal to floor
        killSensorON = false;
      }
      else {
        if (killSensorON) {
          // do nothing
//        Serial.println("doing nothing");
        } else {
          killSensorCount = (killSensorCount + 1) % killSensorTriggerNumber;      //The pattern is 1, 2, 3, 0 and kill, 1, 2, 3, 0 and kill      
//          Serial.print("Kill sensor count: ");
//          Serial.println(killSensorCount);
          if (killSensorCount == 0) {
            //Kill all notes          
            for (uint8_t noteSensor = 0; noteSensor < NUMBER_OF_NOTE_SENSORS; ++noteSensor) {
              sendMIDI(MIDI_NOTE, notes[noteSensor][noteToPlayForSensor[noteSensor]], 0); //Send noteOff
              noteIsPlayingForSensor[noteSensor] = false; // set noteIsPlayingForSensor to false
            }
            //Kill all controllers
            for (uint8_t controllerSensor = 0; controllerSensor < NUMBER_OF_CONTROLLER_SENSORS; ++controllerSensor) {
              sendMIDI(MIDI_CC, controller[controllerSensor], 0);
            }      
            sendMIDI(MIDI_NOTE, 51, 127); //breath note on sampler
//            Serial.println("Kill all notes");
            delay(6000);
            sendMIDI(MIDI_NOTE, 51, 0); //breath note off sampler            
          }
          killSensorON = true;
        }
      }
    }
    else if (currentSensor <= NUMBER_OF_NOTE_SENSORS) { //if it's a note sensor
      uint8_t currentNoteSensor = currentSensor - NUMBER_OF_KILL_SENSORS;
//
//      if  (sensors[currentNoteSensor].timeoutOccurred()) {
//        // Serial.print(" TIMEOUT");
//      }

      delay(50);

      if (distance >= 1800) { // if ping distance is greater or equal to floor
        if (noteIsPlayingForSensor[currentNoteSensor]) { //if note was playing
//          sendMIDI(MIDI_NOTE, notes[currentNoteSensor][noteToPlayForSensor[currentNoteSensor]], 0); //Send noteOff
          noteToPlayForSensor[currentNoteSensor] = (noteToPlayForSensor[currentNoteSensor] + 1) % 4; // set the next note to play (modulo is num of samples in each bank)
          noteIsPlayingForSensor[currentNoteSensor] = false; // set noteIsPlayingForSensor to false
//          Serial.println("note playing false");
        }
      }
      else if (distance <= 0) { //distance is 0 if we get no ping back
        // do nothing
      }
      else {
        if (noteIsPlayingForSensor[currentNoteSensor]) { //we check the current sensor state here since the last ping
          //do nothing because a person is still standing underneath
        } else {
          sendMIDI(MIDI_NOTE, notes[currentNoteSensor][noteToPlayForSensor[currentNoteSensor]], 127);
          noteIsPlayingForSensor[currentNoteSensor] = true;
//          Serial.println("note playing true");
        }
      }
    }
    else { //else it's not a note sensor so is a controller sensor
      uint8_t currentControllerSensor = currentSensor - NUMBER_OF_NOTE_SENSORS - NUMBER_OF_KILL_SENSORS;           //We can't use currentSensor because there are note sensors first. So we subtract the number of note sensors
      int mappedDistance = map(distance, 30, FLOOR_DISTANCE, 127, 0);                 //We need to map our numbers between 127 and 0
      int constrainedMappedDistance = constrain(mappedDistance, 0, 127);    //Mapping still allows numbers beyond what we need, so we constrain
      sendMIDI(MIDI_CC, controller[currentControllerSensor], constrainedMappedDistance); //send the constrainedMappedDistances
    }
  }
}

Thanks Bryce!

Code above, library used is:

You’re welcome Gwen,

If you use the appropriate library as listed in the user manual you should be able to use the function listed on pages 13 and 14 to control the apparent FoV. Make sure to let us know how you go so I can link this for other customers with the same question on the product page. Have a great day!

The receiving SPAD array of the sensor includes 16x16 SPADs which cover the full field of
view (FoV). It is possible to program a smaller region of interest (ROI), with a smaller
number of SPADs, to reduce the FoV.
To set a ROI different than the default 16x16 one, the user can call the
VL53L1_SetUserROI() function.
(https://strawberry-linux.com/pub/en.DM00474730.pdf, 2018)

Bryce
Core Electronics | Support

Thanks again Bryce.

And hello again,

The only library I can see to decrease the ROI is this: https://github.com/pololu/vl53l1x-st-api-arduino/.

However after importing it into the Arduino IDE, I’m not able to get the example to work. I put in println messages to see where it fails, and it never get’s past VL53L1_software_reset(Dev);


There’s also a seemingly unrelated issue where on compilation I get the an error. I’ve resolved it, but just sharing in case there’s some relevance:

l53l1x-st-api.ino:97:85: warning: integer overflow in expression [-Woverflow]
   status = VL53L1_SetMeasurementTimingBudgetMicroSeconds(Dev, MEASUREMENT_BUDGET_MS * 1000);

I resolve the error by substituting MEASUREMENT_BUDGET_MS * 1000 for 50000.

2 Likes

You’re welcome Gwen,

Interesting, it’d be worth opening up an issue on the GitHub repo when using a particular microcontroller as it may be an issue with the currently uploaded version of their script. Assuming that the original creators are still active they’ll get a notification and should be able to see how they can modify their code to suit.

Bryce
Core Electronics | Support

Good call. I’ll reach out to them.

With one of my sensors, I’ve getting a constant distance reading of 65536mm. Not only should this be impossible since the sensors only go up to 4000mm, but the number is suspiciously equal to 2^16!

I’ve checked sparkfun, pololu & ST, but there’s nothing in their docs or on their github issues pages as to what’s going on. Do you have any ideas?

Thanks again!

Hi Gwen,

It could well be a faulty sensor, or it could also be an integer underflow - a lot of the variables in the ST API use unsigned 16 bit integers. It may also be a typo in your code.

I’ve noticed that the examples included when adding the library using the Arduino library manager are quite different to the example in the GitHub repo for the API, but use similar function calls.

I was able to compile the example sketches from both libraries without issue, but I only had one installed at a time. If you’ve installed both libraries, I’d suggest making sure you clear them out of your Arduino libraries folders then re-install just the ST API version.

To set a user ROI you will need to define a VL53L1_UserRoi_t object. This is defined in VL53L1_def.h on line 401:

/** @brief Defines User Zone(ROI) parameters
 *
 */
typedef struct {

	uint8_t   TopLeftX;   /*!< Top Left x coordinate:  0-15 range */
	uint8_t   TopLeftY;   /*!< Top Left y coordinate:  0-15 range */
	uint8_t   BotRightX;  /*!< Bot Right x coordinate: 0-15 range */
	uint8_t   BotRightY;  /*!< Bot Right y coordinate: 0-15 range */

} VL53L1_UserRoi_t;

As per the datasheet you can set the ROI (FOV) using VL53L1_SetUserROI(). I’d suggest adding this to your setup loop. If using the library example sketch, you can use this code:

  VL53L1_UserRoi_t roiConfig;
  roiConfig.TopLeftX = 9;
  roiConfig.TopLeftY = 13;
  roiConfig.BotRightX = 14;
  roiConfig.BotRightY = 10;
  status = VL53L1_SetUserROI(Dev, &roiConfig);

Here’s the full example sketch with the ROI set:

/*******************************************************************************

This sketch file is derived from an example program
(Projects\Multi\Examples\VL53L1X\SimpleRangingExamples\Src\main.c) in the
X-CUBE-53L1A1 Long Distance Ranging sensor software expansion for STM32Cube
from ST, available here:

http://www.st.com/content/st_com/en/products/ecosystems/stm32-open-development-environment/stm32cube-expansion-software/stm32-ode-sense-sw/x-cube-53l1a1.html

The rest of the files in this sketch are from the STSW-IMG007 VL53L1X API from
ST, available here:

http://www.st.com/content/st_com/en/products/embedded-software/proximity-sensors-software/stsw-img007.html

********************************************************************************

COPYRIGHT(c) 2017 STMicroelectronics
COPYRIGHT(c) 2018 Pololu Corporation

Redistribution and use in source and binary forms, with or without modification,
are permitted provided that the following conditions are met:
  1. Redistributions of source code must retain the above copyright notice,
 this list of conditions and the following disclaimer.
  2. Redistributions in binary form must reproduce the above copyright notice,
 this list of conditions and the following disclaimer in the documentation
 and/or other materials provided with the distribution.
  3. Neither the name of STMicroelectronics nor the names of its contributors
 may be used to endorse or promote products derived from this software
 without specific prior written permission.

THIS SOFTWARE IS PROVIDED BY THE COPYRIGHT HOLDERS AND CONTRIBUTORS "AS IS"
AND ANY EXPRESS OR IMPLIED WARRANTIES, INCLUDING, BUT NOT LIMITED TO, THE
IMPLIED WARRANTIES OF MERCHANTABILITY AND FITNESS FOR A PARTICULAR PURPOSE ARE
DISCLAIMED. IN NO EVENT SHALL THE COPYRIGHT HOLDER OR CONTRIBUTORS BE LIABLE
FOR ANY DIRECT, INDIRECT, INCIDENTAL, SPECIAL, EXEMPLARY, OR CONSEQUENTIAL
DAMAGES (INCLUDING, BUT NOT LIMITED TO, PROCUREMENT OF SUBSTITUTE GOODS OR
SERVICES; LOSS OF USE, DATA, OR PROFITS; OR BUSINESS INTERRUPTION) HOWEVER
CAUSED AND ON ANY THEORY OF LIABILITY, WHETHER IN CONTRACT, STRICT LIABILITY,
OR TORT (INCLUDING NEGLIGENCE OR OTHERWISE) ARISING IN ANY WAY OUT OF THE USE
OF THIS SOFTWARE, EVEN IF ADVISED OF THE POSSIBILITY OF SUCH DAMAGE.

*******************************************************************************/

#include <Wire.h>
#include "vl53l1_api.h"

// By default, this example blocks while waiting for sensor data to be ready.
// Comment out this line to poll for data ready in a non-blocking way instead.
#define USE_BLOCKING_LOOP

// Timing budget set through VL53L1_SetMeasurementTimingBudgetMicroSeconds().
#define MEASUREMENT_BUDGET_MS 50

// Interval between measurements, set through
// VL53L1_SetInterMeasurementPeriodMilliSeconds(). According to the API user
// manual (rev 2), "the minimum inter-measurement period must be longer than the
// timing budget + 4 ms." The STM32Cube example from ST uses 500 ms, but we
// reduce this to 55 ms to allow faster readings.
#define INTER_MEASUREMENT_PERIOD_MS 55

VL53L1_Dev_t                   dev;
VL53L1_DEV                     Dev = &dev;

int status;

void setup()
{
  uint8_t byteData;
  uint16_t wordData;

  Wire.begin();
  Wire.setClock(400000);
  Serial.begin(115200);

  // This is the default 8-bit slave address (including R/W as the least
  // significant bit) as expected by the API. Note that the Arduino Wire library
  // uses a 7-bit address without the R/W bit instead (0x29 or 0b0101001).
  Dev->I2cDevAddr = 0x52;

  VL53L1_software_reset(Dev);

  VL53L1_RdByte(Dev, 0x010F, &byteData);
  Serial.print(F("VL53L1X Model_ID: "));
  Serial.println(byteData, HEX);
  VL53L1_RdByte(Dev, 0x0110, &byteData);
  Serial.print(F("VL53L1X Module_Type: "));
  Serial.println(byteData, HEX);
  VL53L1_RdWord(Dev, 0x010F, &wordData);
  Serial.print(F("VL53L1X: "));
  Serial.println(wordData, HEX);

  Serial.println(F("Autonomous Ranging Test"));
  status = VL53L1_WaitDeviceBooted(Dev);
  status = VL53L1_DataInit(Dev);
  status = VL53L1_StaticInit(Dev);
  status = VL53L1_SetDistanceMode(Dev, VL53L1_DISTANCEMODE_LONG);
  status = VL53L1_SetMeasurementTimingBudgetMicroSeconds(Dev, MEASUREMENT_BUDGET_MS * 1000);
  status = VL53L1_SetInterMeasurementPeriodMilliSeconds(Dev, INTER_MEASUREMENT_PERIOD_MS);
  status = VL53L1_StartMeasurement(Dev);

  VL53L1_UserRoi_t roiConfig;
  roiConfig.TopLeftX = 9;
  roiConfig.TopLeftY = 13;
  roiConfig.BotRightX = 14;
  roiConfig.BotRightY = 10;
  status = VL53L1_SetUserROI(Dev, &roiConfig);

  if(status)
  {
Serial.println(F("VL53L1_StartMeasurement failed"));
while(1);
  }
}

void loop()
{
#ifdef USE_BLOCKING_LOOP

  // blocking wait for data ready
  status = VL53L1_WaitMeasurementDataReady(Dev);

  if(!status)
  {
printRangingData();
VL53L1_ClearInterruptAndStartMeasurement(Dev);
  }
  else
  {
Serial.print(F("Error waiting for data ready: "));
Serial.println(status);
  }

#else

  static uint16_t startMs = millis();
  uint8_t isReady;

  // non-blocking check for data ready
  status = VL53L1_GetMeasurementDataReady(Dev, &isReady);

  if(!status)
  {
if(isReady)
{
  printRangingData();
  VL53L1_ClearInterruptAndStartMeasurement(Dev);
  startMs = millis();
}
else if((uint16_t)(millis() - startMs) > VL53L1_RANGE_COMPLETION_POLLING_TIMEOUT_MS)
{
  Serial.print(F("Timeout waiting for data ready."));
  VL53L1_ClearInterruptAndStartMeasurement(Dev);
  startMs = millis();
}
  }
  else
  {
Serial.print(F("Error getting data ready: "));
Serial.println(status);
  }

  // Optional polling delay; should be smaller than INTER_MEASUREMENT_PERIOD_MS,
  // and MUST be smaller than VL53L1_RANGE_COMPLETION_POLLING_TIMEOUT_MS
  delay(10);

#endif
}

void printRangingData()
{
  static VL53L1_RangingMeasurementData_t RangingData;

  status = VL53L1_GetRangingMeasurementData(Dev, &RangingData);
  if(!status)
  {
Serial.print(RangingData.RangeStatus);
Serial.print(F(","));
Serial.print(RangingData.RangeMilliMeter);
Serial.print(F(","));
Serial.print(RangingData.SignalRateRtnMegaCps/65536.0);
Serial.print(F(","));
Serial.println(RangingData.AmbientRateRtnMegaCps/65336.0);
  }
}

FYI, there’s also a getUserROI() function incase you need to call it:

VL53L1_Error VL53L1_GetUserROI(VL53L1_DEV Dev,
		VL53L1_UserRoi_t *pRoi)
{
	VL53L1_Error Status = VL53L1_ERROR_NONE;
	VL53L1_user_zone_t	user_zone;

	Status = VL53L1_get_user_zone(Dev, &user_zone);

	pRoi->TopLeftX =  (2 * user_zone.x_centre - user_zone.width) >> 1;
	pRoi->TopLeftY =  (2 * user_zone.y_centre + user_zone.height) >> 1;
	pRoi->BotRightX = (2 * user_zone.x_centre + user_zone.width) >> 1;
	pRoi->BotRightY = (2 * user_zone.y_centre - user_zone.height) >> 1;

	LOG_FUNCTION_END(Status);
	return Status;
}

Regards,
Oliver
Support | Core Electronics

Thanks for the info Oliver, super helpful.

I think it is a faulty sensor, because all other 16 sensors are running sucessfully with our code/library/examples, it’s just this 1 sensor that’s sending back these erroneous readings (2^16 or -1).

What’s the best move from here to replace the faulty sensor? We’ve got two more on order, could we include a third to replace this faulty one in our pick up today or tomorrow? Our project is installing this week, due in a couple days.

Thanks!

Hey Gwen,

No worries :slight_smile:

It depends a bit on the exact circumstances - being practical, sometimes for very time critical circumstances you’re best to just order a replacement and handle the warranty claim at a later time. If you reply to your order confirmation email (or just shoot us through an email including your order details) we can get this sorted ASAP though!

Please include:

  • a link to this forum topic
  • a list of the troubleshooting steps you’ve taken so far, and
  • a couple of photos of how you’ve got it set up

so we can jump through all the hoops as quickly as we can.

Regards,
Oliver
Support | Core Electronics

Hey Team,

Thanks for helping sort that out so quickly.

Technical question:

We’re finding there’s a limit to how many slave i2c devices were able to run.

We’ve confirmed all 17 sensors are working, in three sections of 5-6 sensors at a time with no problem.
However, when we join any more than 8 sensors together we lose them all.

I’ve been scrawling through forums and posts, but am finding it hard to find an answer.

I’ve considered adding another board (or two) to modularise and spread the load. The only issue is the serial data needs to be concatenated into one serial input device in order to reach its destination (ableton via hairless midi serial bridge).

The only ways I am finding to link multiple boards in this master/slave daisy chain is via i2c, which isn’t possible because that’s what we’re using for the sensors.

Any help super appreciated. We can’t find any examples online that use more than 9.

Thanks! Gwen

1 Like

Hi Gwen,

I believe the constraint for the number of sensors you can use at one time is based on the timing budget of the sensor. Have a look at section 2.5.2 of the datasheet of the sensor.

PS: some good notes here on getting the most out of your I2C bus

I would have a look into that, and just to double-check; have you changed the address of each of the sensors? There is a good guide on Adafruits page here:

There’s some other

Let us know how you go with it!

Cheers,
Liam.

If I can put in my 2 cents …
Addressing.
I2C can address up to 128 devices, most devices come with a default address which can be changed by software updating a register in the device. If two devices have the same address the bus will fail.
You can run a utility program to see what device addresses exist on the bus. (the Raspberry Pi had this ability)
But, as you say, it fails on more than 8 devices; it sounds like the library software is only allowing 8 unique addresses. It might be using bits of a byte to represent an address which would miss lots of addresses. (8 bits in a byte)
Of course I could be completely wrong with this theory.

Length of cable run:
I2C can be only be used over a short distance without some buffer drivers. We are talking about a few meters not 10 or 100. Check how long the cable run is and test with more than 8 devices with short cables.
Again I could be completely wrong.

These are just a few thoughts I had when reading your post.

Cheers
Jim

3 Likes

Hey Gwen,

Of course James, all help is appreciated!

As for the i2c detection. If you’ve got a Pi, run the scripts below and send through the output when you’ve got the parts all connected and we’ll see whether the addressing is occurring correctly as it should be and what changes when adding the extra sensors.

> sudo apt-get install i2c-tools

> sudo i2cdetect -y 1

Bryce
Core Electronics | Support

1 Like

Can be done in via Arduino as well (given that’s the dev board in use). With either dev board pathway, a little I2C debugging would help uncover if it’s an address limitation of the other libraries.

https://create.arduino.cc/projecthub/abdularbi17/how-to-scan-i2c-address-in-arduino-eaadda

1 Like