Object and Animal Recognition With Raspberry Pi and OpenCV

cN YOU PLEASE SOLVE THIS ERROR

Python 3.7.3 (/usr/bin/python3)

%Run object-ident.py
[ WARN:0] global /home/pi/opencv-4.4.0/modules/videoio/src/cap_v4l.cpp (1004) tryIoctl VIDEOIO(V4L2:/dev/video0): select() timeout.
Traceback (most recent call last):
File “/home/pi/Desktop/Object_Detection_Files/object-ident.py”, line 50, in
result, objectInfo = getObjects(img,0.45,0.2)
File “/home/pi/Desktop/Object_Detection_Files/object-ident.py”, line 21, in getObjects
classIds, confs, bbox = net.detect(img,confThreshold=thres,nmsThreshold=nms)
cv2.error: OpenCV(4.4.0) /home/pi/opencv-4.4.0/modules/imgproc/src/resize.cpp:3929: error: (-215:Assertion failed) !ssize.empty() in function ‘resize’

Hi Tim, thank you so much for your guide!

I was trying tensorflow lite but my CPU run at 300% and didnt stop! Using opencv and COCOS files worked very fast.

My question is, how can I generate my own files from COCOS dataset: classFile, configPath and weightsPath ?

Thank you so much!

1 Like

Hi Tim, thanks for the wonderful tutorial . i just wanted to ask how can we control the wheels of Turtlebot3 robot (it uses dynamixel xl 430 motor) with the same technique you have used. Thanks.

2 Likes

Hey mate glad to of helped :slight_smile:!

To solve what I think you want come take a look at this - Edge Impulse . This is free for a maker and will let you customise an already built Machine Learned system (like the Coco library used in this guide). That way you will be able to generate your own personalised machine-learned library that piggie backs off the COCO library.

There are usually lots of different ways to solve the same problem, and I’m sure there are other ways you could go about it but above is what I would do.

1 Like

Heyya mate,

To control a motor with a Raspberry Pi Single board computer a great guide is linked here.

You can then take the scripts here and from that guide, combine them together, add in some ingenuity and you’ll have your system working the way you want :slight_smile:

1 Like

Hi Tim, I was following the code for Object Detection and I noticed that my Raspberry Pi 4 is having a 4 seconds delay in video streaming. Is it normal? or is there a certain part in the code I should change?

A follow up question would be how to implement your own model inside it? Thankssss!

2 Likes

A 4 Second delay is definitely a lot more than I have over here, which is surprising. I have more like a half a second delay. Install a heatsink and try overclocking your Raspberry Pi just a little, that should help a lot.

And if you want your own objects to be identified the software/process you should take a look at is this- Edge Impulse .

1 Like

Hi Tim, I am using your tutorial for our project. I am using Pi 3B+ and Buster OS. I am trying to install opencv into the Pi using the commands you provided in the tutorial. I am now in the make -j $(nproc) step but nothing happens when I enter this command. I even tried to make it cmake -j$(nproc) but only an error occured.


And these are what happened to the cmake commands before I went to the command I am currently stuck.


I even installed cmake on our Pi and issued a nano CMakeLists.txt command to make the cmake commands work. What were the mistakes I made and what should I do so the make command would work and starts installing? Thanks.

P.S. Honestly I am totally unfamiliar with Pi and this is my first time working on a project using raspberry pi.

2 Likes

Hey mate,

Can definitely help get you an up and running system :blush: love that your jumping in at the deep end.

See below for how I set up the | cmake -D CMAKE_BUILD_TYPE=RELEASE \ | and the following choices. It is not as clear as I would like in the above formatting of the written guide. I reckon that is where the issue is.

Then if that doesn’t work out for you just roll back and start from a fresh Micro-SD card and make sure to plug in each line. Gimmie a pop if you run into further issues, it looks like you’re very close.

2 Likes

I’ve been trying to get OpenCV installed and working for 2 full days now. I tried my best not to clutter the thread with a question that has already been answered, and check elsewhere on the internet too. But I still have 1 OS giving me an error in Thonny (That’s the farthest one I’ve gotten so far). And 2 later OS’s with the same error now.

Let’s start with the further along one. I struggled to get past the multi line CMAKE part for a while and likely ran through the entire terminal process a few times. Once I realized my issue was with some Copy/Paste issues, I was able to manually enter those lines and get past it.
When I got to the part of running “object-indent.py” I get this error in Thonny:

I re installed gtk2.0 “again” but still get the same error. I even tried some other mashed together solutions from this forum to attempt to update it but nothing has fixed this error for me.
For some context here I am very new to Pi and more of an Arduino guy. So if there is something super obvious here, please fill me in. I was wondering if maybe I was updating gtk2.0 incorrectly.
I’ve tried “sudo apt-get install libgtk2.0-dev libgtk-3-dev” again, then tried “sudo apt-get install libgtk2.0-dev” as well, thennn even tried “pip3 install --upgrade libgtk2.0-dev” but that gave me some other error. I only tried that final one out of pure exploration and desperation, not knowing how all these commands and directories fully work.
Past that I wasn’t able to follow the other suggestions it gave. I don’t really understand how to configure the script and assume that is fine anyways. I believe I did run " sudo apt-get install build-essential cmake pkg-config" again as well. I’ll give that one more go just in case.

So I moved on to a new install.Figured it would go much easier after messing around with all this for a day. Another Buster install, followed your other guide and everything went fine as always. Ran each line, one by one in Terminal without any issues. It all went fine till I got to the multi line CMAKE bit again. I tried to enter it manually 3 times, but kept getting the same error. So I learned how to copy and paste each single line without it auto entering, and I still got the same error, no matter how I entered it. “bash: cmake: command not found”.
Now luckily others have had this issue so I had thought I was saved. I followed what you had another do and re installed the “sudo apt-get install build-essential cmake pkg-config” command again and I am still getting the same error. Here is the shot of that.

This seems like it would be so easy and I hear so many others getting it up and running, so I know its something on my end. But its basically been, install Buster, copy/paste lines to Terminal, error and I can’t figure either of these issues out. And now I seem to be stuck in the loop of the “bash: cmake:” error on every install since. I’m at a dead end : (
I appreciate all the help you give people and I hope this is a simple fix you see in this. I tried to make this clear, but I may have rambled a bit of extra details : P

3 Likes

Hey mate, thanks for all the images and details! It makes it much easier for me to help troubleshoot.

I reckon you are incredibly close, in that last image you sent after you typed the | sudo apt-get install build-essential cmake pkg-config | and right before you typed | cd ~/opencv-4.0.0 | the system asks you | Do you want to continue? [Y/n] Y | it looks as though you typed Y but perhaps not enter, then it didn’t install the packages but instead Aborted.

That’s the reason there isn’t a cmake library on your system to do the long build process.

Hope this helps and if you run into any other issues come pop back and we’ll get your system up and running as it should :slight_smile:

2 Likes

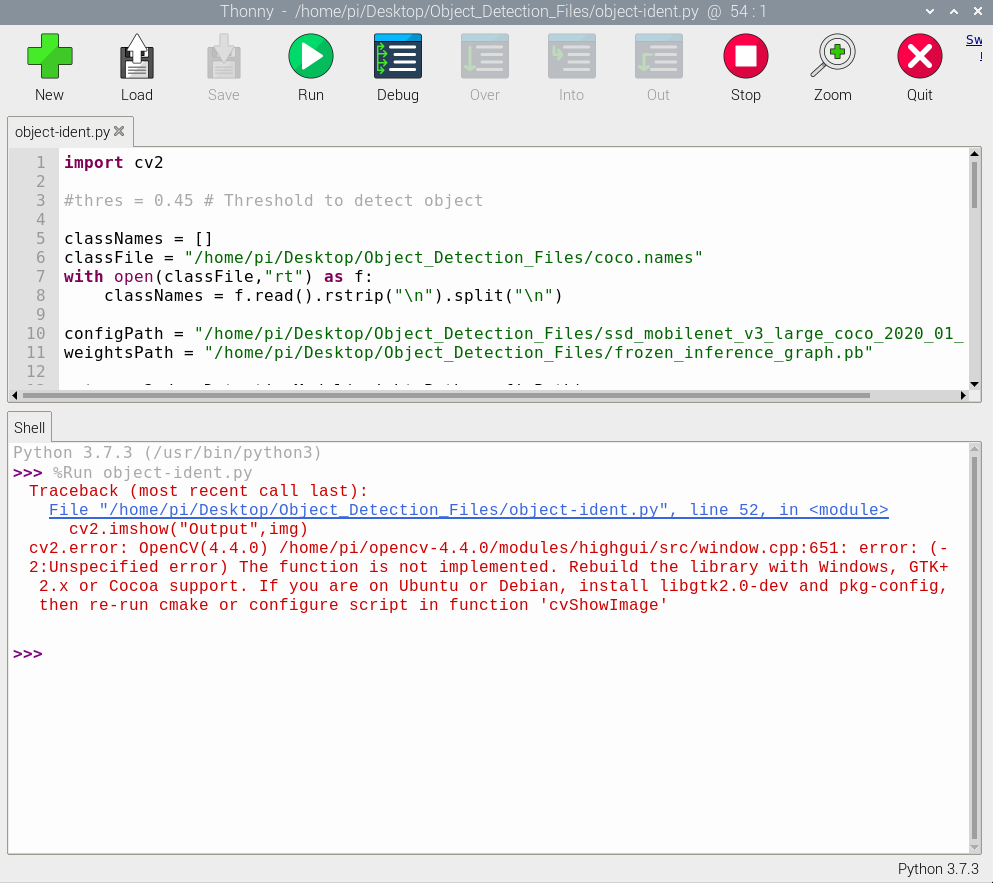
I don’t know why, but it would always says abort after I try to update one of those terminal command lines. Over the last 3 days I’ve done the Y/n commands a hundred times without issue. Even in the screen shot above, I hit “Y” then “Enter”. I don’t know how you would get past that line without hitting Enter after a Y or an n. Because of this I’ve still not been able to install the multi line CMAKE commands on any Pi other than the one that was having the issue in Thonny. So I hammered away on that one since it was further along at least.
I re ran all of the terminal commands again from scratch as though I hadn’t already done it once and after all of that, it magically ran this time.
I am super curious as to why I can’t get the CMAKE commands to go on any other installation or get that “build-essential cmake” line to stick, but at this point,that’s a problem for another day.

Anyways, its running now at least. I have more tinkering to do so these may be solved by the time this gets a response but I have 1 issue and 2 question.
The issue I’m having here is, I’m getting roughly a 2 second delay. More than most seem to have. I’m also only tracking cats so it should be a lighter workload than average. I’m running on a Raz 4, 4GB with a small heat sink. Haven’t messed with any overclocking or anything else. Only thing I’ve done out of spec so far is I’ve enabled “Serial Port” under “Interfaces” since I plan on exporting data to an Arduino later. I’m also using an official Pi camera and have a class 10 SD card.
I will try putting a fan on the heat sink tonight, and see where that gets me. If that doesn’t work I will look into over clocking, which I’ve seen you explain in comments above. If all else fails I will get a Coral stick but I wanted to make sure I was working on a solid foundation before I added anything fancy like Coral or Overclocking.

So my questions are code questions. Well the TLDR for this one is: How can I get the (x, y, w, h) from the boxes this code draws on the target?
I’m basically trying to track cats in a room so I’ve been flipping between your code here and your code form the Face Tracking Pan Tilt Hat. In the Face Tracking I see that you use “cv2.rectangle()”, but in this posts code you aren’t using that command. I see where it happens still as you commented it for us (4th line from the end or so), but I don’t understand how this draws the box without the specific .rectangle method. So my main question here is, how can I pull the (x, y, w, h) from any boxes drawn.

Other question is: Is there a simple way to limit the detections to a maximum of 1? I tried changing the NMS to 0.1 and that still occasionally gave me some stacked boxes. I was going to experiment with using a value of Zero here in a bit but I assume that will not work lol. All the NMS guides on Google seem overly complex for what I’m attempting to do here so just curious if there is a simple way to set a cap of 1 detection. Not a huge deal, but if there is, cool.

Thanks for the response. I’m sure it takes a lot of time to reply to all these project questions and I appreciate you helping all of us beginners. Honestly don’t know if I could have even gotten OpenCV installed without your help.

Pretty interesting doing all this OpenCV research on my lunch at the company that started its development. I was wondering if it was actually designed in my building, but looks like it’s main contributors were from around the globe and not one facility.

2 Likes

I have same makefile:182:all error2 at 80%, I tried running | make -j $(nproc) | command several times, still showing same error.I also tried using | make |,| make -j |, | make -j4 |commands. I am using raspberry pi4 model B. Do anyone have any solutions?

2 Likes

Ok so I feel really silly for asking this, however I can’t see the download zip files at the end of the article. Am I missing something here?

1 Like

It looks like the link is broken. When I click on it, nothing downloads or re directs.
I can Email the file to you if you would like since I have it from already working on it these past 2 weeks or so. But maybe Tim will get it back up if he sees your post.

1 Like

I too do not see the zip file and would like it sent to me if possible.

1 Like

I actually don’t see any links at all myself. I ended up finding another example online - not as complete or comprehensive as this but working all the same. Thanks for reaching out!

1 Like

Hey all, script files will be back soon, we have a new Website and just ironing out the niggly, teething issues.

Guides will be back at 100% ASAP. Props goes to Mark for getting it working regardless :slight_smile: @RogueMike @Mark197030 @Robert197288

Excellent job getting it all running mate :slight_smile:! I am baffled as to why you can’t get the CMAKE library to be installed as well.

Your 2-second delay is definitely longer than what I have over here. I reckon Overclocking + some active cooling and you’ll be going significantly faster (although peculiar that it is slower, perhaps its the RAM amount, the system I run on camera was a 4GB version of the Raspberry Pi 4 Model B)

In regards to your code, definitely going down the right path to combine Object Identification with Face Tracking. It is crucial that you get those (x, y, w, h) details. As soon as you have them you can adjust the Pan-Tilt HAT to keep the target in the centre. The Object Identification Script uses a | cv.rectangle() | keyword. Looking here at Example 1 I reckon the simplest way to pull those details is by adding a line | print(box) | or | print(bbox) |. It’d be one or the other. Also you can uncomment | #print(classIds,bbox) | which will give all the details of found objects to the shell. If that works then you now have the key to access the information about each rectangle.

If only a single box is desired I reckon the easiest way is to introduce a new/altered If Statement somewhere after | if len(classIds) != 0: |. Alter that line to | if len(classIds) = 1 |. That way it will only search for one new object. Having found that it will not look for more. Thus you now have only one Rectangle of your target to manage and with a little finessing you should be able to combine that with the Face and Movement Tracking Script.

Now I haven’t attempted this, so some trial and error are likely in order to get the above to work smoothly. However thanks for reaching out, hopefully this helps :slight_smile: and big thanks for the kinds words. OpenCV is really very remarkable. Check this link to get deep into the Keywords that OpenCV comes with. Keen to see what you come up with! Definitely share if you getting it working and tracking your kitties, I’d be ecstatic to see that.

1 Like

Have you increased your swapfile so it equals CONF_SWAPSIZE=2048? Also, could you send through an image of the Terminal when it reaches that 80%, that’d be very helpful for me in troubleshooting.

Normally by running that command again (I’ve had to run it 3 times in a row once) it’ll speed run up to where it got to last time then keep increasing percentage each new run of the command. Is odd to me that it is stuck on something when it hits that 80% and can’t continue. We’ll get it working together though :slight_smile:

2 Likes