Stephen just shared a new tutorial: "Getting Started on The Things Network"
Since you’ve got your new Pioneers Platform for Pycom assembled, with a Lopy4, Expansion Board, and Lora Antenna, let’s start sending data to the cloud! The Things Network is a great free service that collects data transmitted over LoRaWAN. The…
Read more
Dumb question. The code in this tutorial gives 3.81 V when I have 4.19 V measured on the expansion board with a DMM. It also seems to have trouble connecting to the things network after only 20 minutes or so of operation when it hits 3.60v as reported by the app.
[edit] Not sure but this might be the answer.
The channel ADC value is 2556.
Using the code in the tut
2556 (adc value) * 2 (voltage range ?) / 4086 / 0.3275 (voltage divider?) = 3.81 V
Doing some research there is a voltage divider of 115k ohm & 56k ohm on pin 16. The correct voltage divider agrees with the code & calculated as 56k/(115k+56k) = 0.3274853801.
Mode attn = 3 according to the ADC docs sets the input full scale to 3.3 V. As the docs say …
ADC pin input range is
0-1.1V. This maximum value can be increased up to3.3Vusing the highest attenuation of11dB. Do not exceed the maximum of 3.3V, to avoid damaging the device.
But then i found this article that said the full scale is 3.548 V for 11db attenuation and the ADC is non linear V across its range of integer values.
[edit 2] I also found in the docs that ADC is not factory calibrated and suggests that you should calibrate using the onboard ref and a known voltage source supply. This backs up the non linear calibration mentioned above and I use in the Mathcad analysis below.
Hi Peter,
Using this code I usually get a value of about 4.18V. I’m not sure what might be making your readings come out a bit lower. It sounds like your board is under powered. Are you running off a battery or off a USB?
What kind of coverage do you have in your area? Is this a problem of poor reception?
Its happening when on USB power with the battery connected and the charge LED off (so full charge). My multi-meter shows 4.18V at the battery terminals as they attach to the board. Based with good/elevated line of sight (ie Merewether Heights) to Eighteen04 in Parry St.
I dusted off Mathcad which is pretty good at doing complex analysis while still showing working. I found my observed values of around 2600 integer on the ADC agreed with the following assumptions and checked measurements with my multi-meter.
- The LoPy4 ADC has a non linear calibration which includes 70mV offset at 0db attenuation that increased to 0.248V at 11db attn.
- attn is 2 despite the code setting --> adc_c = adc.channel(attn=3, pin=‘P16’)
PDF
Mathcad - LoPy 4 ADC Calibration 20190205_094800.pdf (34.8 KB)
MCad Zipped
LoPy 4 ADC Calibration 20190205_094800.zip (58.8 KB)
I modified the code to log the integer ADC value on Pin 16 every 10 sec to the SD card and every 10 times to TTN. Strange things are afoot… 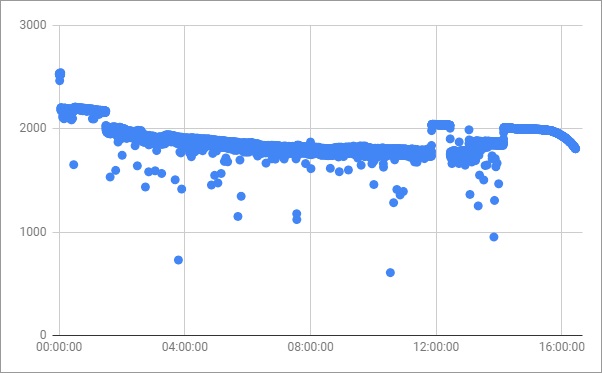
MyLopy4MonitorApp 20190207a.zip (1.6 KB)
batlog2_2019-02-06T0718Z.zip (38.2 KB)
Hi Peter,
Sort of expected - The ADC on the ESP32 is far from ideal. This is a limitation from Espressif and a well-known point of frustration.
You can build your own offset/calibration tables (which fix the cal issues). Also use bubble sorting (median average) with at least 10 samples. Between those, it’s very stable.
If you find improvement opportunities in the docs, you can make a pull request here:
I only made very minor changes to the tutorial code. It still does the 20 samples then then picks the median. I just commented out the voltage conversion to leave it as an integer. Perhaps the median value isnt always the best pick and should think about some other error checking …
2 Likes
Since you’ve got your new Pioneers Platform for Pycom assembled,
That’s probably the most challenging part of this project. Instructions anyone? There are 10 parts to that platform, and I can’t figure out how they are supposed to fit together. Advice much appreciated. In the meantime, I’ll just continue without it.
Hey Dan,
I wrote out some instructions for you on your other post.