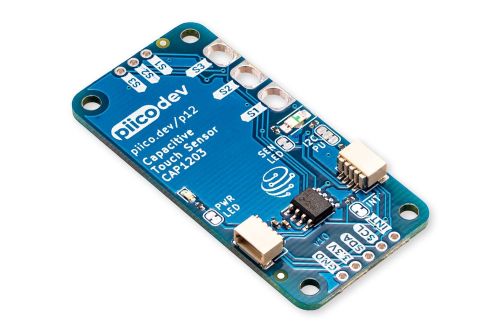
This is a placeholder topic for “PiicoDev Capacitive Touch Sensor” comments.

Add user control to your project with three touch pad inputs.
Read moreThis is a placeholder topic for “PiicoDev Capacitive Touch Sensor” comments.

Add user control to your project with three touch pad inputs.
Read moreAre there any instructions for the Capacitive Touch Sensor for basic wiring?
Are the 3 pins up the top for outputs? And are the 3 pins on the side for touch inputs?
Welcome Adam!!
Which dev board are you using? Instructions and connection guides can be found on the product page for the 3 main dev boards.
I’m not using a dev board. I was hoping the 3 pins at the top are 3.3v outputs that switch on when the touch pads are touched. Is that correct?
Hi Adam
If you look at the schematic on the product page you will see that the 3 pins on the end and side are wired together for external inputs then to the on board sensors. I believe this is for flexibility in connecting as the end pins can accept a 2.54mm header strip and the side are apparently for alligator clip connection.
The output is I2C via the header pin connection points at the bottom or the 2 connectors.
I note that Core have sensibly made the I2C pull up resistors an option, good thinking.
It might help if it were known exactly what you are using.
Cheers Bob
Hey @Adam256248 and @Robert93820,
You’re exactly right Bob, it is purely just an electrical connection to the surface of each switch, so rather than using the touch pads that are provided on the face of the sensor, you can instead either use some 0.1" headers, alligator clips, or just solder directly to those pins to use some other item such as the blade of these scissors that Michael is demonstrating as the touch point for the switch. This is the same trick that some (usually old) lamps used to use to turn on when you tap the base.
Unfortunately you’ll probably want to use a MicroPython supporting board to use this sensor, the only way to communicate with it is via I2C. We’ve got a few tutorials up for this sensor in particular:
p.s. conveniently .1" or 2.54mm pitch through-hole pads like this work really well with pogo pins for testing manufactured stock in bulk ![]()
Hi Adam,
You’ll need a microcontroller to interpret the signals from the sensor.
Something like this provides a HIGH LOW digital output: Capacative touch sensor | Core Electronics Australia
Hi Adam,
The PiicoDev capacitive touch sensor doesn’t have an output connector per channel, it’s a sensor using an I2C interface.
There are two way to connect to the sensor to an I2C bus to read the output. You can use the 4 wire PiicoDev connectors, or you can solder header pins onto the device and access the 4 pins required for I2C communication that way.

This guide outlines how I2C communications work using Arduino as an example if you’re not familiar.
No, that’s just a cuttable connection to the I2C pull up resistors.
The input and output uses SDA and SCL for Serial DAta and Serial CLock respectively to communicate with a breakout board via I2C.
They’re also connected to this custom JST-SH connection to be cross compatible with the rest of the PiicoDev range of modules and adapters:

Here are some other Capacitve touch sensors that instead of using I2C and Serial communication, simply have power, ground and an output pin. All have fairly wide operating voltage ranges and should be fine to run at 3 - 3.3V:
And this module is toggle-able, meaning that it’ll stay on or off until it is tapped again, rather than only when being touched:
Does the I2C output act as a 3.3v output? so I can connect it to a relay switch without requiring any other chips?
when the touch sensors are touched is there a 3.3v output from the I2C?
I also want it to have jog output
Not directly no.
I2C stands for Inter-Integrated-Circuit, it’s a way for microcontrollers and modules to communicate. It can be imagined like a conversation on a telephone, but with bits rather than words.
If you just want a digital On-Off 3.3V output the modules I linked in my last response should do the trick, although you’ll want to make sure that they can output enough current to drive your relay (which I suspect they may not be able to, although I could be wrong)
OK great. Do the the other modules have jog output? (On when touched, off when released)?
Hi Adam,
There are two variants, one is a toggle, the other momentary:
If you want more granularity/control than that, you’ll probably need to get a microcontroller involved.
Let us know if this sparks further questions!