Stemma qt / qwiic direct to GPIO pins for capacitive touch sensor

Hi I wish to connect my raspberry pi pico to a piico dev CAP1203 capactive touch sensor by a stemma qt to standard female pin cable.
Like this:

I wish to learn from the example code provided, but I can’t figure out which pins to connect it to on the pico, and then what code i need to modify for the connection. I had a good search about before asking but all of the examples just used the adapter boards for the stemma qt to stemma qt cables.

Any suggestions or example code would be appreciated. Many thanks. Leo

4 Likes

Hi Leo,

Excellent question!

The PiicoDev connections assume that you are using I2C0 which is pins GP8(SDA) and GP9(SCL), and power is 3v3 on the RPi Pico expansion board, you can checkout the product page here:PiicoDev Expansion Board for Raspberry Pi Pico - Adapters - PiicoDev Australia.


A good reference is the pinout reference card that you get occasionally in Core orders.

I dabbled in something similar for a macro keypad using Adafruits mechanical variant (much like the new Core smart modules). High pitch screeching coming from a board - #3 by Liam120347

4 Likes

Thanks @Liam120347

I am likely going to use a waveshare 1.8" lcd panel for the pico with this.

Which uses gpio 8 and 9. Am I able to use other pins such as 18, 19, 20 or 21 which are i2c ports too?
At the moment I am just using the example code from here:

I’m wonder if / how i would need to jerry rig this code should i use alternate gpio pins.
I hope this question is ok - just getting my head around this… cheers

2 Likes

I think you should be able to use one of the other I2C buses by just adding a bus=X argument to the initialisation call for the touch sensor, like, touchSensor = PiicoDev_CAP1203(touchmode='single', bus=1)

Or actually, looking at this pinout, it seems you might not need to change the code at all, and can just use another set of pins in I2C0, like GP0 and GP1.

3 Likes

Hey @Oliver33 thanks for your reply.
I tried GP0 and GP1 but it didn’t like it. It wouldn’t recognise the sensor. I also tried 20 and 21, same deal.

2 Likes

Hmm, seems like you need to set the pins as well as the bus, like this guy does (though this example is in C++ instead of Python)

Having a quick look through the python code, it appears it’s not enough to just set the pins, you also need to set the frequency or it’ll ignore your pin request inputs.

You’ll also need to import from machine I2C, Pin, or alternatively, just import machine if you’ve got the space. Then you can set your sda and scl pins, and create your object using:
touchSensor = PiicoDev_CAP1203(touchmode='single', freq=400000, sda=Pin(0), scl=Pin(1))

Here are some examples from the documentation:

from machine import Pin

p0 = Pin(0, Pin.OUT)    # create output pin on GPIO0
p0.on()                 # set pin to "on" (high) level
p0.off()                # set pin to "off" (low) level
p0.value(1)             # set pin to on/high

p2 = Pin(2, Pin.IN)     # create input pin on GPIO2
print(p2.value())       # get value, 0 or 1

p4 = Pin(4, Pin.IN, Pin.PULL_UP) # enable internal pull-up resistor
p5 = Pin(5, Pin.OUT, value=1) # set pin high on creation
from machine import Pin, I2C

i2c = I2C(0)   # default assignment: scl=Pin(9), sda=Pin(8)
i2c = I2C(1, scl=Pin(3), sda=Pin(2), freq=400_000)

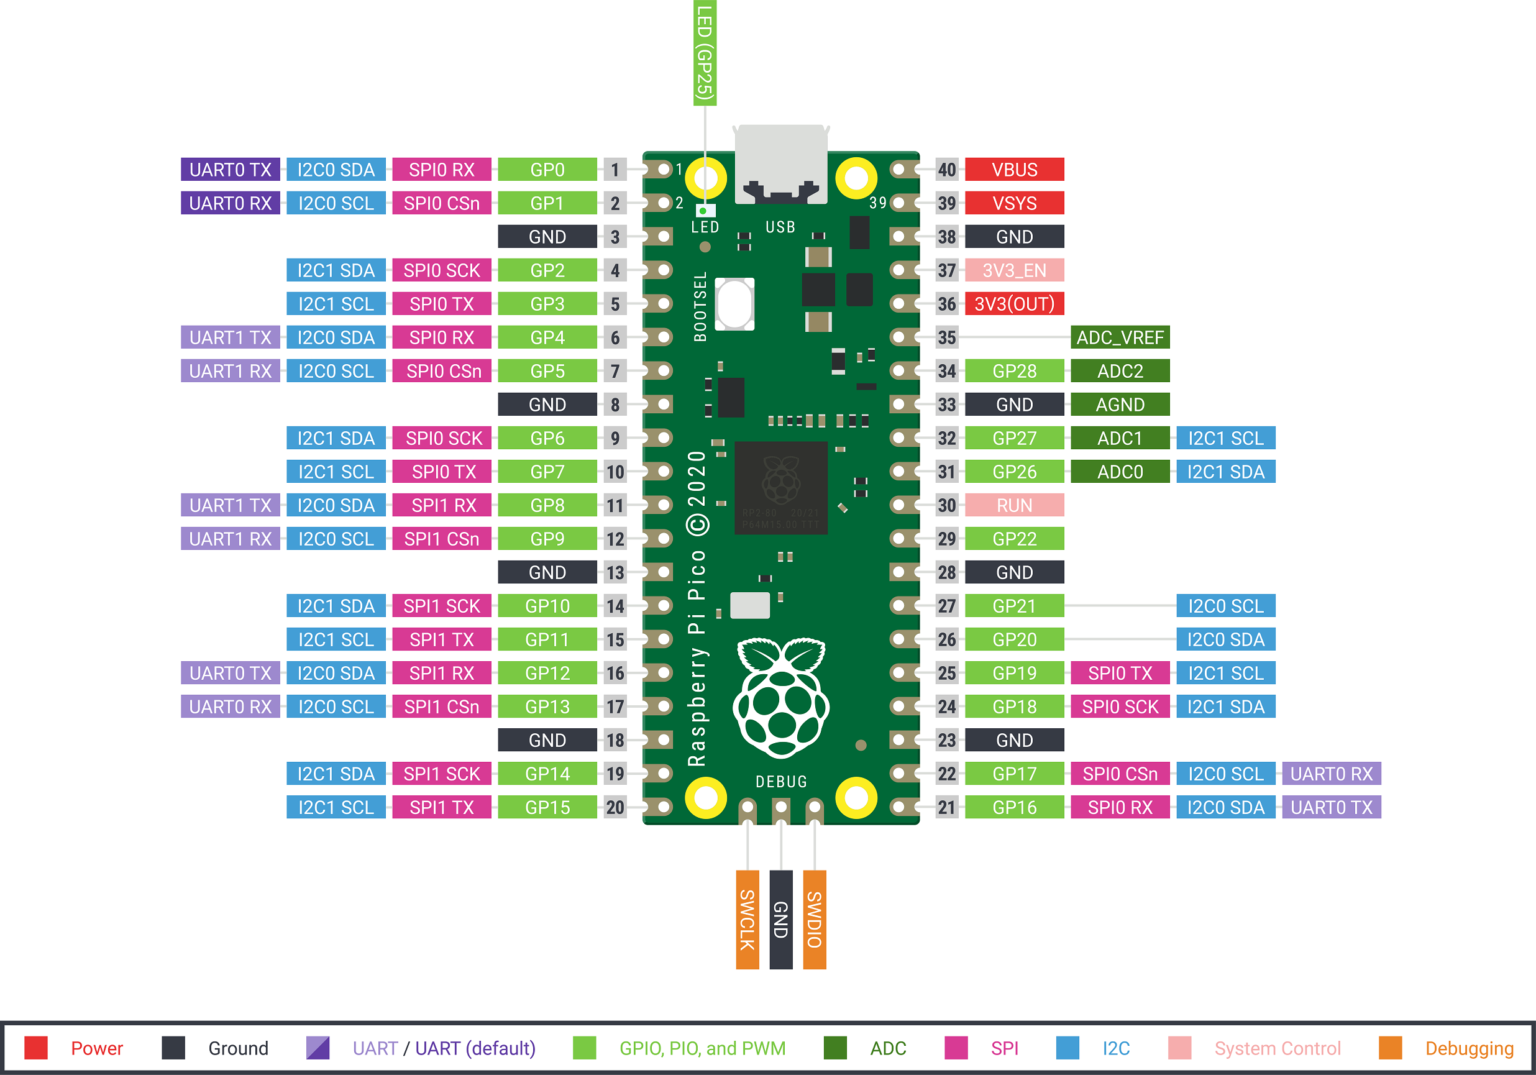
PS, here are the default I2C values if you don’t specify them:
image

See:
https://docs.micropython.org/en/latest/library/machine.Pin.html
https://docs.micropython.org/en/latest/library/machine.I2C.html

https://docs.micropython.org/en/latest/rp2/quickref.html#general-board-control

5 Likes

Thanks for that detailed information @Oliver33 . I’ve read recently that the picos only have one 12c address?
But what you have posted seems certainly worth tinkering with to see if i can get it to work. Will get back to you after i’ve tried. Thanks again.

5 Likes

Hi Leo,

Just to clarify there is a difference between Piico or PiicoDev(This is the range of modules that Core makes) and the Raspberry Pi Pico.

I can confirm that the capacative touch sensor only features one address but the Pico has a few pins that you can use to send and receive information on via the I2C protocol. This boils down to how stuff works inside the RP2040 chip onboard.

When you initialise the capacative touch sensor you can still use the default bus (I2C0) and respecify the pins used. Replace it with the following

Just make you also import the Pin module as well using from machine import Pin

6 Likes

Great thanks Liam. I appreciate the explanation and example.

5 Likes