COMPONENTS AND SUPPLIES
Arduino UNO & Genuino UNO x 1
SG90 Micro-servo motor x 1
IR receiver (generic) x 1
JustBoom IR Remote x 1
Jumper wires (generic) x 1
ABOUT THIS PROJECT
ABOUT THIS PROJECT
With this simple Arduino project, you can control a servo using a remote control. All you need is an Arduino Uno board (or similar), a servo motor (doesn’t have to be very powerful), a TV remote, an IR receiver (TS0P1738), and a small piece of cardboard.
Let’s get started!
Installing the IR Library:
The very first thing that we need to do associating with Arduino is to download the IR library.
First you need to connect the parts as per the given circuit diagram:
[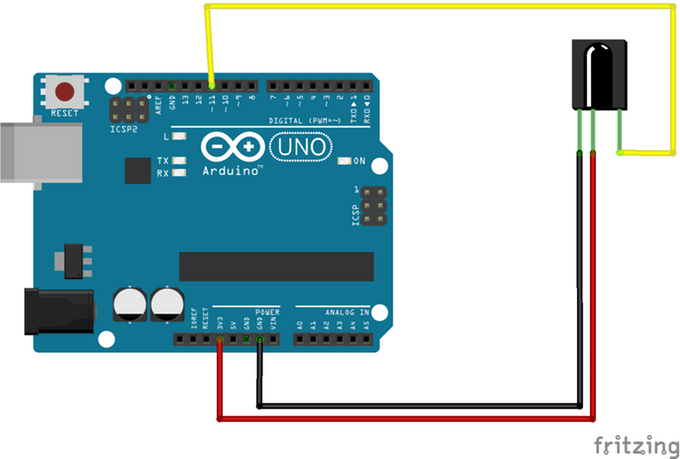 ](javascript:openLightBox(‘b6a2bc95c6’, 0)
You can checkout Pin out of TSOP1738 below:
Use the following code to decode IR remote:
/*The IR sensor's pins are attached to Arduino as so:Pin 1 to Vout (pin 11 on Arduino)Pin 2 to GNDPin 3 to Vcc (+5v from Arduino)*/#include <IRremote.h>int IRpin = 11;IRrecv irrecv(IRpin);decode_results results;void setup(){Serial.begin(9600); irrecv.enableIRIn(); // Start the receiver}void loop() { if (irrecv.decode(&results)) { Serial.println(results.value, DEC); // Print the Serial 'results.value' irrecv.resume(); // Receive the next value }}
[ ](javascript:openLightBox(‘5ca5740aa9’, 0)
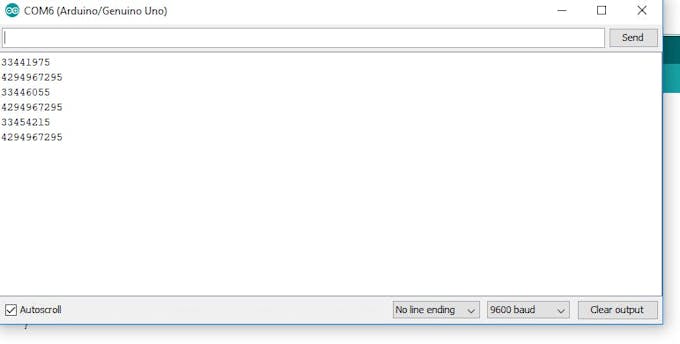
- Open Arduino IDE and Upload code
- Open Serial Monitor
- Aim your remote at the sensor and press each button
- You can see different numbers for each button
Consider any two buttons, and note down decoded values. In my case, I have chosen the Power button and Mode button.
I got the following values:
- Power button=33441975
- Mode button =33446055
We will be using this two values to control rotation of servo motor.you need to add this two values in the program which is given on next step:
[ ](javascript:openLightBox(‘0d65f2e20a’, 0)
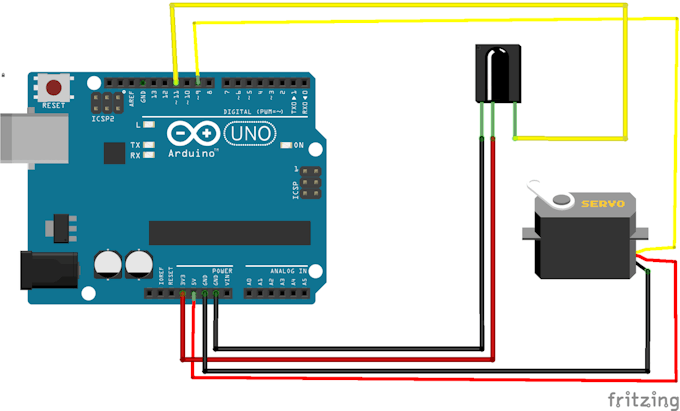
Let’s set-up the final hardware!
The Final Circuit!
[ ]
]
CODE
#include <IRremote.h>
#include <Servo.h>
int IRpin = 11; // pin for the IR sensor
IRrecv irrecv(IRpin);
decode_results results;
Servo myservo;
void setup()
{
Serial.begin(9600);
irrecv.enableIRIn(); // Start the receiver
myservo.attach(9); // attaches the servo on pin 9 to the servo object
}
void loop()
{
if (irrecv.decode(&results))
{
irrecv.resume(); // Receive the next value
}
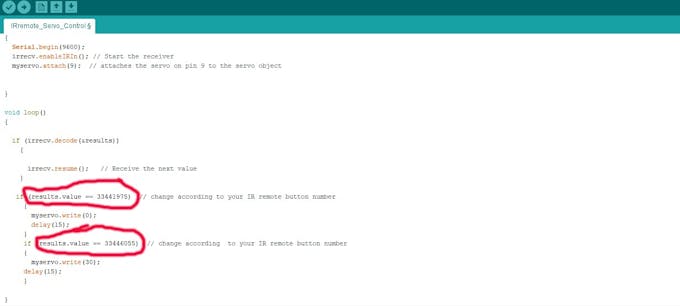
if (results.value == 33441975) // change according to your IR remote button number
{
myservo.write(0);
delay(15);
}
if (results.value == 33446055) // change according to your IR remote button number
{
myservo.write(30);
delay(15);
}
}
Visit 7USD for PCB Assembly