I’m looking to build 10+ custom trail cameras using raspberry pi and various modules. I’d love to do the sourcing for this through Core as it’d be great to have an Australian distributor for after sales service.
So far I’ve tried using off the shelf trail cams and for the most part they’ve met our needs. However, they were far too slow at taking photos to meet our requirements, so we’re going to try to build our own.
I was wondering if someone could give me any advice on the following specs we require:
HD camera
Night vision
PIR
4G transmission
Battery powered
We will be developing the software ourselves, but if there’s already open source software we could customise that would be handy.
The cameras would need to be capable of detecting movement and taking a photo at a rate of at least once a second (not all the time, but at times it would be required). In addition to this, the battery setup would need to last about a day.
Thanks so much for your interest Yep, we are very excited to be working on this, we just hope it’s even possible
Here are the answers to your questions:
We are capturing photos of participants as they move through a course.
Night vision is required as the event will finish in the night. I believe the PIR is needed so that the camera is only on when needed to reduce power usage.
The cams will be anywhere between 1-10km apart.
Looking forward to discussing it further. Thanks again!
Definitely possible!
I’d check out the following components, let us know if you have any alterations and we’ll see if we can find a more suitable part.
The battery is a bit tougher than the rest of the components, once you get your software working (possibly handling the power to the camera and 4G module) then you’ll be able to get a gauge on how much power you use.
I’ve got one of these at home for super rough Pi power requirement setups but a power profiler or Otii Arc would be better suited for measuring power consumption.
Overkill mode might include a SLA battery and step down module to make sure its powered for as long as possible (if you leave the system on the battery might get damaged).
Thanks so much, Liam! It’s great to know this project is possible
I’ll take your advice and buy these components and get testing. I’ve got a Raspberry Pi 3 Model B here I’m hoping I can use to test. On that note, which pi model do you think would be most suitable, considering I need to be conscious of power output. I’m guessing a pi zero wouldn’t allow for all of these components to be connected?
Also, likely a very dumb question but is the Nightvision component only capable of taking nighttime photos and therefore I’ll need the regular pi camera component as well?
Thanks again for your help! I’ll post some updates on the project once I’ve been able to do some testing.
Those night vision cameras work day and night. They can be tuned to know when to turn the night vision on. We also have this guide comparing different cameras on the Pi.
As for which Pi is best, I’d say Pi Zeros with 4G sim HATs . My current thoughts are to connect them like a cctv project using MotionEye OS. We have another guide here that you may also fancy having a read of.
Thanks so much, Jack! That’s so great the one cam can be used for both day and night. Also good news about the pi zero being suitable, I think that would be ideal for the battery situation.
I’ll check out the guides and the MotionEye OS!
I’m getting excited to try it all out. Thanks again everyone for all the advice
A quick but of clarification about that camera, since it doesn’t have an IR filter it blows out a bit in daylight, colours still there but not as present, there are some cameras from Arudam that have a mechanical toggle for the IR filter.
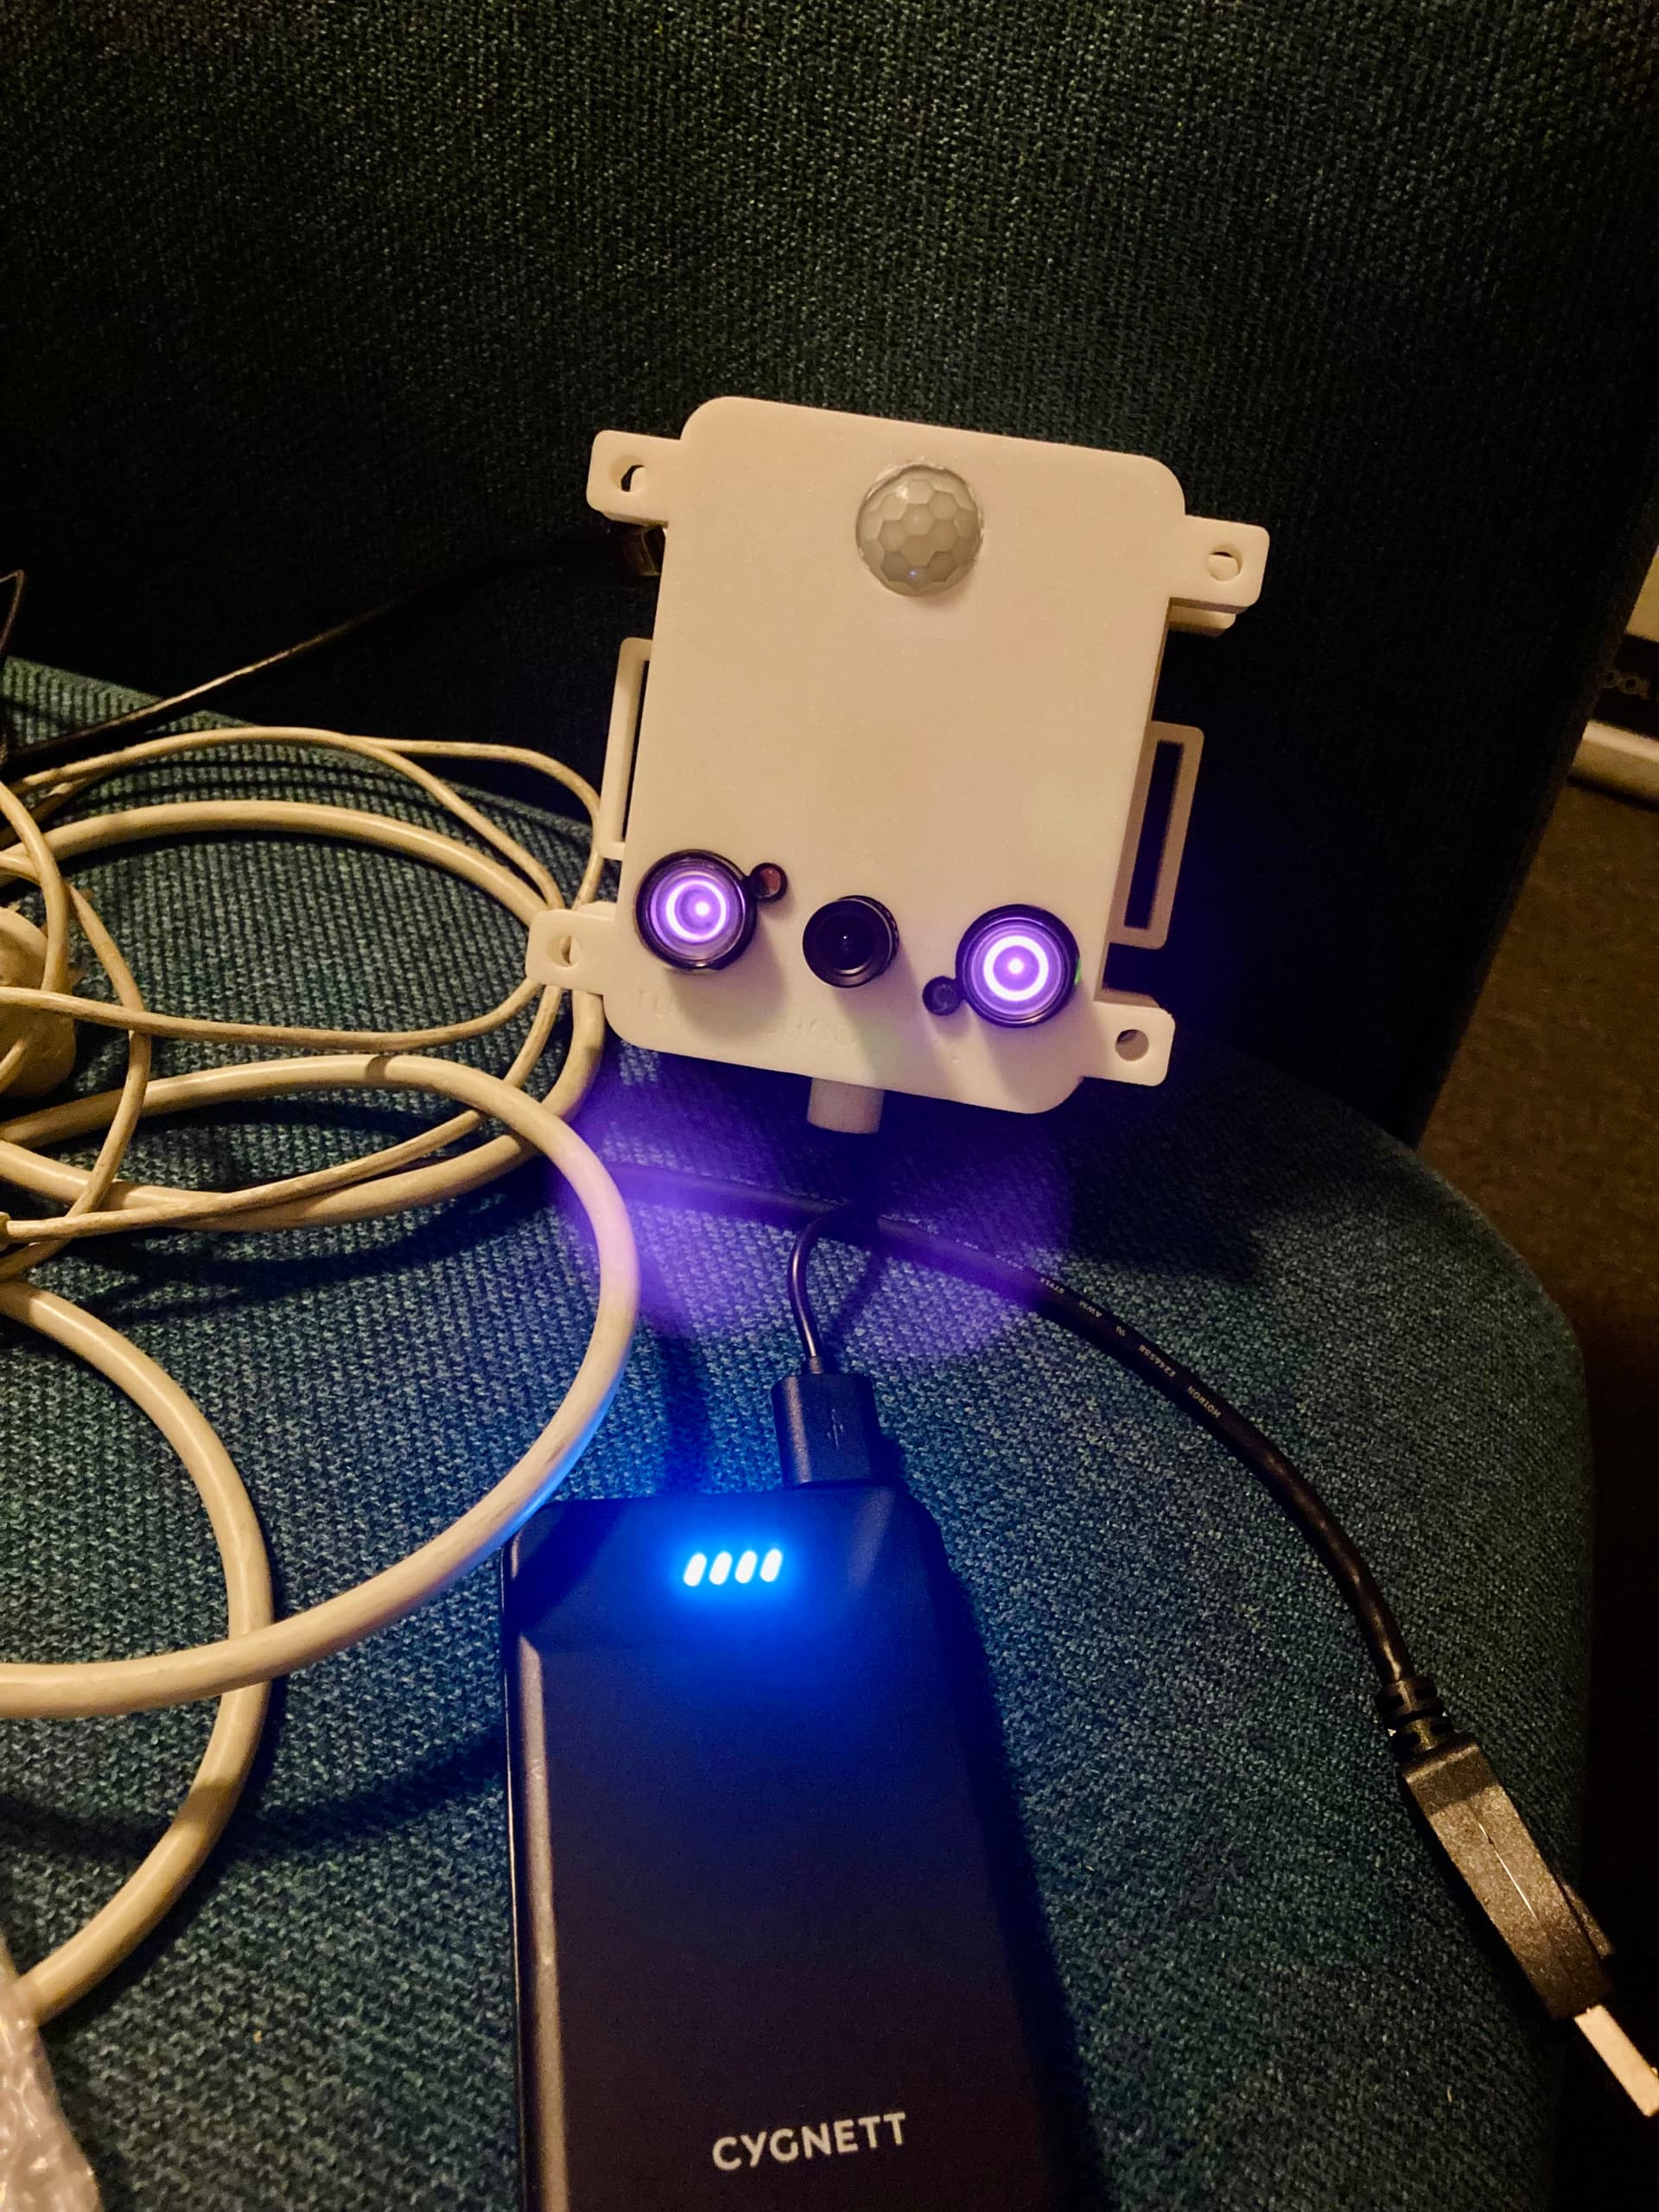
Hi guys, just an update on this project; we’ve slowly made progress, we have it housed in a 3D printed unit we’ve made many iterations of (still more to come), the PIR is sensing movement and firing off the camera. We have another process running which FTPs the images to our web server for processing. Here are some progress photos:
However, we’ve come up again some issues with the “Raspberry Pi Camera Board - Night Vision & Adjustable-Focus Lens (5MP)” taking very blurry photos. It seems to have got progressively worse too. At first I thought it could be smudging on the lense, but I’ve cleaned it and it makes no difference. Could there be something else I’m not considering? Here are some examples:
Also, I think idealy we’d like it to take normal daylight photos with true colours, and use a nightvision camera separately. What do you guys think? I guess that would be a problem with the pi zero as it only has one slot for a cam. I recall someone talking about a cam that can mechanically switch between day/night, is that correct?
I noticed recently the PIR started to be perpetually in an on state. I had manually turned down the sensitivity on the module (see below) and it was working perfectly, but something has recently cuased it to always be firing. I’m wondering if the cam and PIR issues are related. I tested with mains power in case it was a power issue, but it makes no difference. Maybe it’s the wiring from the module to the GPIO?
Changed both manual positions and it was working perfectly until recently.
Here’s a basic test script we’ve been using to test the PIR and camera in case something in the code is of any significance:
# Import required Python libraries
import time
import RPi.GPIO as GPIO
import picamera

# Use BCM GPIO references
# instead of physical pin numbers
GPIO.setmode(GPIO.BCM)

# Define GPIO to use on Pi
GPIO_PIR = 7

# Set pin as input
GPIO.setup(GPIO_PIR,GPIO.IN)

Current_State  = 0
Previous_State = 0

try:

	print("Waiting for PIR to settle ...")

	# Loop until PIR output is 0
	wait = 0
	# added wait of 10 seconds because of recent PIR issues
	while GPIO.input(GPIO_PIR)==1 and wait<10:
		Current_State  = 0
		wait = wait + 1
		time.sleep(1)

	print("  Ready")

	piccounter = 0
	camera = picamera.PiCamera()
	camera.resolution = (1920, 1080)
	camera.hflip = True
	camera.vflip = True

	# Loop until users quits with CTRL-C
	while True :

		# Read PIR state
		Current_State = GPIO.input(GPIO_PIR)

		if Current_State==1 and Previous_State==0:
			start_time=time.time()

		if Current_State==1:
			# PIR is triggered
			print("  Motion detected!")
		  	# Record previous state
			Previous_State=1
		  	# capture image now
			now_time = time.strftime("%Y%m%d%H%M%S", time.localtime())
			camera.capture('captures/image' + str(now_time) + '.jpg')
			piccounter = piccounter + 1

		if Current_State==0 and Previous_State==1:
			# # PIR has returned to ready state
			stop_time=time.time()
			elapsed_time=int(stop_time-start_time)
			print(" (Elapsed time : " + str(elapsed_time) + " secs)")
			Previous_State=0

except KeyboardInterrupt:
	print("  Quit")
	# Reset GPIO settings
	GPIO.cleanup()
Apologies if I’m saying some silly things, I’m particularly new to the hardware side of things.
Thanks again for all your help!
Thanks for the Update on this project Josh
That 3D printed housing’s really making it look like a well polished project.
For the out of focus issue, does the focus change when the lens is threaded in and out from the camera housing? If it doesn’t it might be worth removing the lens completely to see if there’s any marks on the sensor below.
I’m not quite sure what could be causing the PIR module to change in sensitivity though. If changing the threshold with the Pots doesn’t fix the issue it might require a bit of a deeper dive into what could be causing the issue.
PIRs operate on infrared light - it may be that the sensor is getting swamped by the sun under different conditions. I’ve encountered this issue with PIRs outdoors before if the sun can directly shine upon the sensor