This is a placeholder topic for “LiPo Charger Basic - Micro-USB” comments.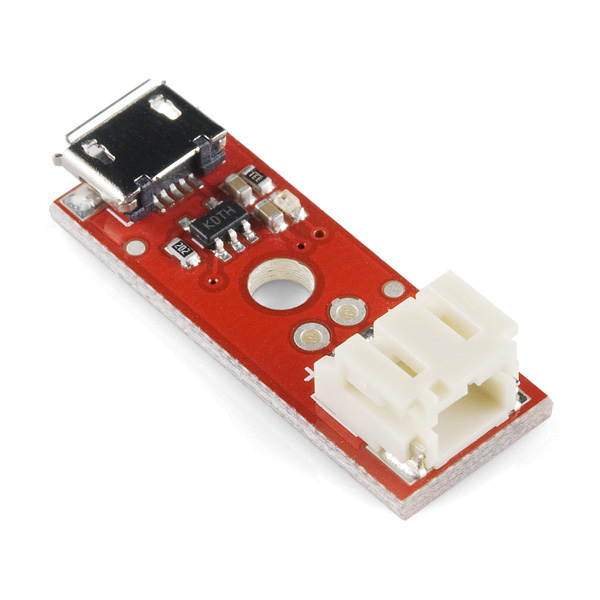
If you need to charge LiPo batteries, this simple charger will do just that, and do it fast! The LiPo Charger Basic is stripped down of all features and just does one thing well - charge 3.7V LiPo cells at a rate of 500mA per hour. It is designed to charge single-cell Li-Ion or Li-Polymer batteries. Check the datasheet below to see if it will work with your battery.
Read more
Hi folks.
A total novice here.
I want to build a small pump module that incorporates a 3.7v LiPo battery and a USB charger such as the Sparkfun LiPo Charger Basic here https://core-electronics.com.au/lipo-charger-basic-micro-usb.html. If the battery and charger and pump are all enclosed within a case and the battery is connected to the charger, where is the power picked up for the pump? (And switch.) Is it the two points immediately behind the JST connector?
Thanks in advance for your help. (And apologies for my ignorance!)
Andrew
1 Like
It is not recommended to connect the supply for the pump to the charger. The charger is designed to provide a specific voltage and current for the battery according to its current state of charge. The load of the pump may interfere with the charging ability of the charger, and could even overload and damage it. You need some circuitry to ensure that the pump connection to the battery (as a load) is separate from the charger connection (as a supply). This could be manual - a switch that switches between charging state and running state - or it could be automatic. This is known as load sharing. There is some discussion here.
2 Likes
Hi Jeff. Thanks kindly for your response. I probably should have added that the pump will not in any circumstance be operated while the battery is being charged. It will be removed from the power source for the charger and used elsewhere. Does this make any difference? Cheers, Andrew
1 Like
In that case the simplest option would be to attach a matching JST plug to the load. With that arrangement you would disconnect the charger from the battery and plug the load into the battery instead. That has the advantage that the USB supply and charger can then be recharging a spare battery until it is needed. If that is not practical then the schematic indicates that JP8 is available for connecting a load. However the images suggest that it is not installed, so the only other option is to solder to the thru-holes marked + and - which appear to be the spot for locating JP8 if it was installed.
2 Likes
Thanks Jeff. Much appreciated.