This is a placeholder topic for “Adafruit Assembled Pi T-Cobbler Breakout for Raspberry Pi” comments.
Now that you’ve finally got your hands on a Raspberry Pi® , you’re probably itching to make some fun embedded computer projects with it. What you need is an assembled … read more
Read more
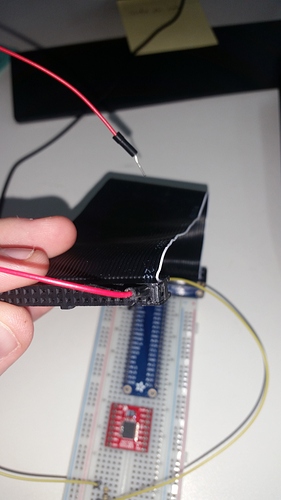
Hi Folks, just starting to put Pi together with T-Cobbler, https://core-electronics.com.au/adafruit-assembled-pi-t-cobbler-breakout-for-raspberry-pi-11800.html shows the cable has a twist… the white stripe is going to the “left” side of the breadboard and “right” side of the Pi. I’m confused because I can’t replicate that. Thanks, George
Hi George,
I’ve just checked the continuity with one here, and the pin I’ve put the header in is the 5V (Pi pin #2). That would imply the picture on the store page is incorrect, and I’ll get the support guys to have a look at it.
As long as you can plug it in and the pins on the cobbler match up to what is on the Pi, you don’t necessarily need the twist in the cable.
1 Like
Thanks for that Josh, I’ll search for the pin-outs on the Pi and check the continuity to the T piece shortly [I keep getting interrupted  ]. The cobbler has a locator but the Pi looks like the plug could go on in either direction but then the white stripe would be on the wrong side.
I’m a 2 hour newby and I don’t want to let any smoke out!!
1 Like
Don’t worry, we all have to start somewhere. I’m happy to help if you’ve got any other questions about your Raspberry Pi, but I’d suggest you look at our free online course that you can follow at your own pace, or come to our Raspberry Pi Beginners Workshop where I can run you through how to get started and answer any questions you might have.
Letting the magical smoke out is really bad, it’s so hard to catch it and put it back in 
Chuckle chuckle. I’m a retired electrician - I’ve let the smoke out of many things. Sometimes it was a lot of smoke accompanied by adrenalin raising noises!
Hi again, Josh.
I have started putting this together.
In the section ‘The Circuit’, it says “The RGB LED is common anode
(the positive pin is common to the three colours)…”
Now, I understand anode as being negative, not positive so that text
looks wrong to me. That has confused me a bit but I can sort of
understand how the circuit works.
Next thing, I have an RGB LED which have an anode and is marked ‘-’ on the little circuit board, like this one…

If I wire mine with anode to negative and then change the code so the switching is opposite (transpose the 1s and 0s) will it work as expected and continue to keep the magic smoke confined?
I hope you can understand that and not get one of those ‘last day of the week’ headaches
Cheers,
George
Anode is positive, cathode is negative. The way I remember it with common-x LEDs is: common cathode (t looks like a +), apply + to the 3 wires to get colour; common anode (n for negative) apply - to the 3 wires to get colour.
I looked up that LED board, and it is indeed a common cathode, so it won’t run backwards like you suggested.
1 Like


 ]. The cobbler has a locator but the Pi looks like the plug could go on in either direction but then the white stripe would be on the wrong side.
