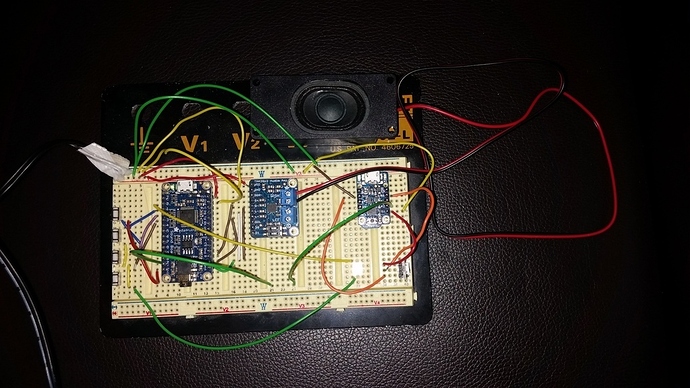
So, this is my first attempt at anything arduino and I think it’s going pretty well. What I want the prop to do is flash a light and play a sound when the trigger is pulled. Looking around, I came across the adafruit boards which seem to fit the bill. The parts I’m using in this build are;
- Audio FX 2MB Sound Board
- Trinket 5V
- 2.3W Stereo Amplifier (Will probably swap to a 2.5W Mono Amp for the final build)
- Neopixel (Demo only has 1, Probably will use 5 in the prop for other lighting effects)
- 4 Ohm Speaker
- 4x Push Buttons
- 2500mAh Portable Powerbank USB battery (not pictured)
So after screwing around for a few days not really knowing how best to put it together and learning alot of things on the fly, my breadboard looked quite messy and confusing;
Luckily, I have Fritzing from my earlier circuitry days and mocked the circuit up there to make it neater.
So, what is happening here? Well, firstly, starting at the top (of the fritzing diagram), I’ve used a USB plug as the representation for the 5V power supply. The ground here connects to the main power switch (not currently on my breadboard). Then, you guessed it, the 5V pin connects to the 5V pins on the trinket, audio fx and audio amplifier boards. The main guts of my circuit is the audio fx board. So looking at that next, I have the Right audio output hooked up to the Right audio input of the amp. This then connects to the speaker. As I mentioned above, I’ll probably look to save space with a mono amplifier when it comes to putting the electronics into the blaster. I only have space for one speaker, so the Left channel is pretty pointless.
All the business is now happening on the left of the audio fx board. Pins 0 through 3 all drive different sound effects. I don’t have the part in fritzing for a rotary switch, but I plan to use one to control which pin is active when you pull the trigger, in turn generating the correct sound effect. Pin 0 triggers the blaster sound effect on a hold loop. This means when the trigger is released, the sond effect stops, but it loops while the trigger is held. Pin 1 controls an alternate fire sound effect on single play. It will play once when the trigger is pressed. Releasing the trigger does not stop it playing. Pins 2 & 3 control extra sound effects that I thought might be a bit fun. Pin 2 has 10 files loaded which the board cycles through. Pin 3 has 2 files which the board plays one of randomly when triggered. I may add an effect to Pin 4 for the reload sound, but I need to make sure I have enough space for another switch.
Finally, on the Audio FX Board, I have the ACT pin hooked up to pin 2 on the Trinket. I discovered this ACT or Activity Pin works the same as a button. When both boards (the Trinket and the Audio FX board) have the same GND, the ACT pin reads low when a sound is playing. So I have this triggering the trinket to activate the neopixel instead of linked to the trigger button. The result? After a bit of code manipulation, the neopixel pulses it’s greeny/blue light whenever the sound is playing, somewhat well synced with the sound effect. Release the trigger and when the sound stops, the neopixel stops pulsing 
And there we have it! A simpleish solution to making a blaster prop come to life. Things that I’ll probably change before putting it in the blaster are;
- Use an Audio FX Board without the onboard headphones jack. This will save space as since I’m using an external amp, the onboard one is redundant.
- 3.5W mono amp instead of a 3.2W stereo amp. Again, space saving. There isn’t alot of space inside the prop.
- Utilizing Pin 1 on the trinket to drive a string of 4 more neopixels. This will allow me to light up the accents of the prop as they are in the video game instead of painting the accents and loosing the true glow as many people do.
Now I just need to wait for the 3D printed parts to arrive before I can put it all together 


 It’s fun to tinker with these things. Will update when I get the 3d print and play with that a bit.