Hey Tim,
That battery shield you linked looks like it has a solderable jumper to set the charge current, but it’s only 500mA or 1000mA: (EDIT: Read to the end! This might be incorrect!)

The way these jumpers work is usually by setting the voltage on a pin with a resistor divider. If you’ve got one of these shields already, you could lookup the datasheet for the charge IC and swap out the resistors for a higher value which will set the charge current you need.
It’s much easier (but less educational!) to switch to a bigger battery or a different shield though.
I see you’ve purchased one:
From that link, here’s the schematic:
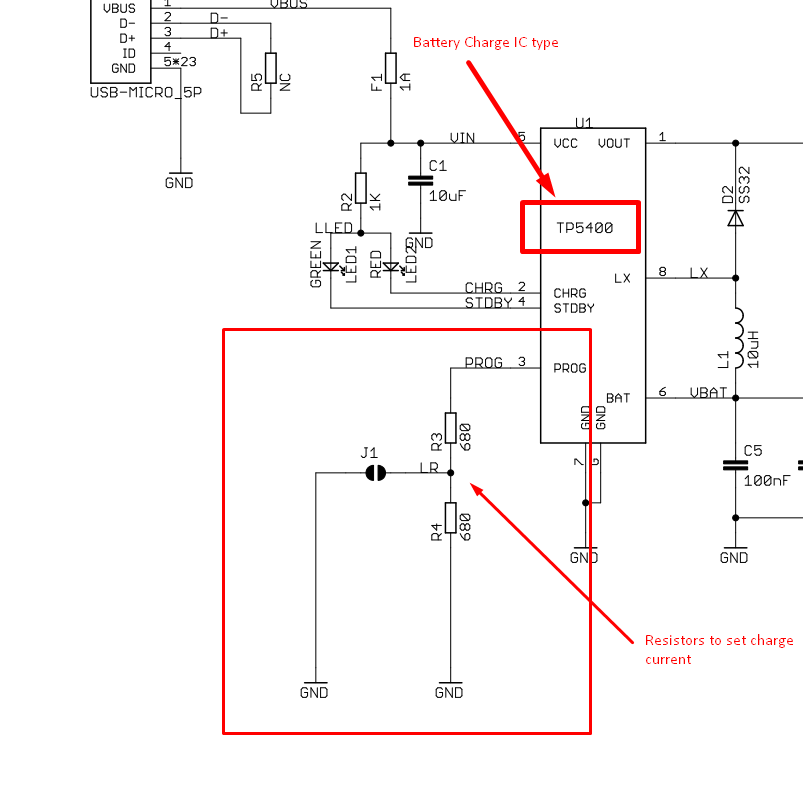

If we just google for ‘TP5400 Datasheet’ we find this datasheet which looks to be all in Chinese:
TP5400.PDF (563.7 KB)
Not to worry! Most of the important stuff is the same in any language, and fortunately, google translate on your phone is pretty good these days ![]()
This looks to be the typical application circuit, and you can see they’ve called the pin that controls the charging current ‘PROG’

So we just look through until we find something about ‘PROG’ that’s worth translating…

You can try your luck with pointing your phone camera at your screen, but I’ve found the best way is to screenshot it and email it to myself, then import it into google translate (select camera, then import in the bottom right) - it gets the clearest image of the text and so gives the best results.
And here’s another section of interest a bit further down…

So, now we can see that actually, according to the datasheet this charging shield is wrong! Leaving the jumper open will indeed charge at about 1 amp, but shorting the jumper tries to push the charger well past its limits by drawing 1.6 Amps (1100 / 680 = 1.62A)! The charge IC is only rated to 1.2Amps max!
However, in my googling I discovered there’s a very similar version of this chip, the TP5410
TP5410.PDF (855.5 KB)
Which has a different formula for charge current based on RPROG:

The values for this IC actually match up with what they’ve used on the board (680 Ohms for 1A, 1.36k for 0.5A) - so perhaps they used to use the TP5400, and now use the TP5410? Then everything would all make sense.
If your board says TP5410 on it, then you should be able to desolder those two charge resistors and replace it with one that will set a suitable charge current for your battery, say 350mA.
To be honest though, unless there’s some strong reason to use the Wemos D1, Grab a Pico with headers and the CE Piicodev Adapter thing. It’s got a charge IC on it that will work out of the box with your 400mAh battery, and those guys have definitely done things right, as well as the Pico itself being very well supported.