So come break your television and monitors free from the confines of their edges with Hyperbian! This is an open-source ambient light software that will improve the way you enjoy your favourite media, is totally free and works great on a Raspberry Pi 4 Model B. I have created one with 250 LEDs+ on the back of a little monitor but you do not need to use such a dense LED strip to get a great effect. With an awesome schematic let me show you exactly how I set up my Ambilight set-up here and teach you how you can do something similar at home. And all without soldering!
You may be interested in messing around with the bootsplash on your Pi to get some awesome effects if you can get a nice PNGs from HyperBian from screencaps:
Thanks for publishing this guide I used it to make my first Raspberry Pi project, although I chose to do mine a little bit different to yours.
I wanted to be able to use the Pi for more than just Hyperbian so I used Raspberry Pi OS then installed Hyperion.NG as a service always running in the background. This meant I could add my second project onto the same Pi (as Pis are scarce lately) which was a PiHole.
I used hippo clips to do the corners in my LED strip and only ended up needing to solder two wires to make the GPIO connections.
One huge setback I had was that by default when I installed Hyperion.NG my WS2812 lights wouldn’t come on even though I knew they had power and worked with a different one-wire protocol source I tested them with. It turns out to be able to use the PWM output on pin 18 you need to install the service to run as the root user. I found the commands on the Hyperion forum and will include them below to save someone else the hours of troubleshooting I had to do.
Depending on which version of Hyperion you are using the service may be called hyperion or hyperiond, the command needs to be adjusted accordingly.
Everything is running smoothly now and looking good, there is just one thing that I still need to solve. When the HDMI source turns off the USB capture card reads a rainbow test pattern, so I’d like to find a way in software to detect that pattern and recognise it as a no signal state so the lights can be turned off. Right now whenever I’m not using it, I’m just disconnecting the plugpack powering the LED strip.
Brilliant mate! Hippo clips are awesome would love to see it a photo of your set-up operating. And huge thanks for sharing your troubleshooting solution, it is exactly that kind of thing that will save future people’s sanity.
I believe somewhere in the effects sub-menu is a setting so that when it doesn’t receive information you can make it do exactly what you want instead of defaulting to rainbow.
Perfect timing!, as I just bought a couple of parts from core-electronics to create this ambient light effect to my TV.
One thing I didn’t buy is the power adapter (d’oh!), as I thought I have a spare one at home;
It turns out I need more power to be able to light up the strip.
Also, if let’s say I need to double the LED length to 10m, can I ‘combine’ 2 x plastic-cover power adapters? as I’m not keen to have a metal-casing power adapter, where my kids can accidentally touch the internal electric parts…
One thing to remember is that you’ll rarely be pushing all your LEDs at full blast. If you think about how much light a 10W LED globe in your ceiling can throw out, you don’t actually need too much wattage to beat the light levels of even the screen itself.
However, it’s actually a good idea to spread power across a long strip, to fight voltage drop and make sure you don’t burn out the traces, so you can absolutely use as many supplies as you need.
I’m pretty certain the rainbow pattern is the no-signal pattern generated by the USB capture card when it detects no input on HDMI, which is a hassle because Hyperion still considers it a perfectly valid input and tries to light up accordingly.
Everything worked great last night while watching a movie but after fiddling around with the settings some more I’m having the lights get frozen on one output and stop responding to the signals sent by Hyperion which is a bit strange. I had it following the Xbox and turned the Xbox off, but the lights still corresponded to that input, even though I was trying to instead send it a test pattern from the effects configurator.
Power cycling the LED strip made the lights just turn off which confirmed the lights were just stuck on an old pattern and Hyperion was no longer sending LED output information.
It seems I will need to get it fixed and back to where it was before I can chase down the rainbow pattern solution.
Overall, awesome project! I just wish the documentation for Hyperion wasn’t a blank work-in-progress document.
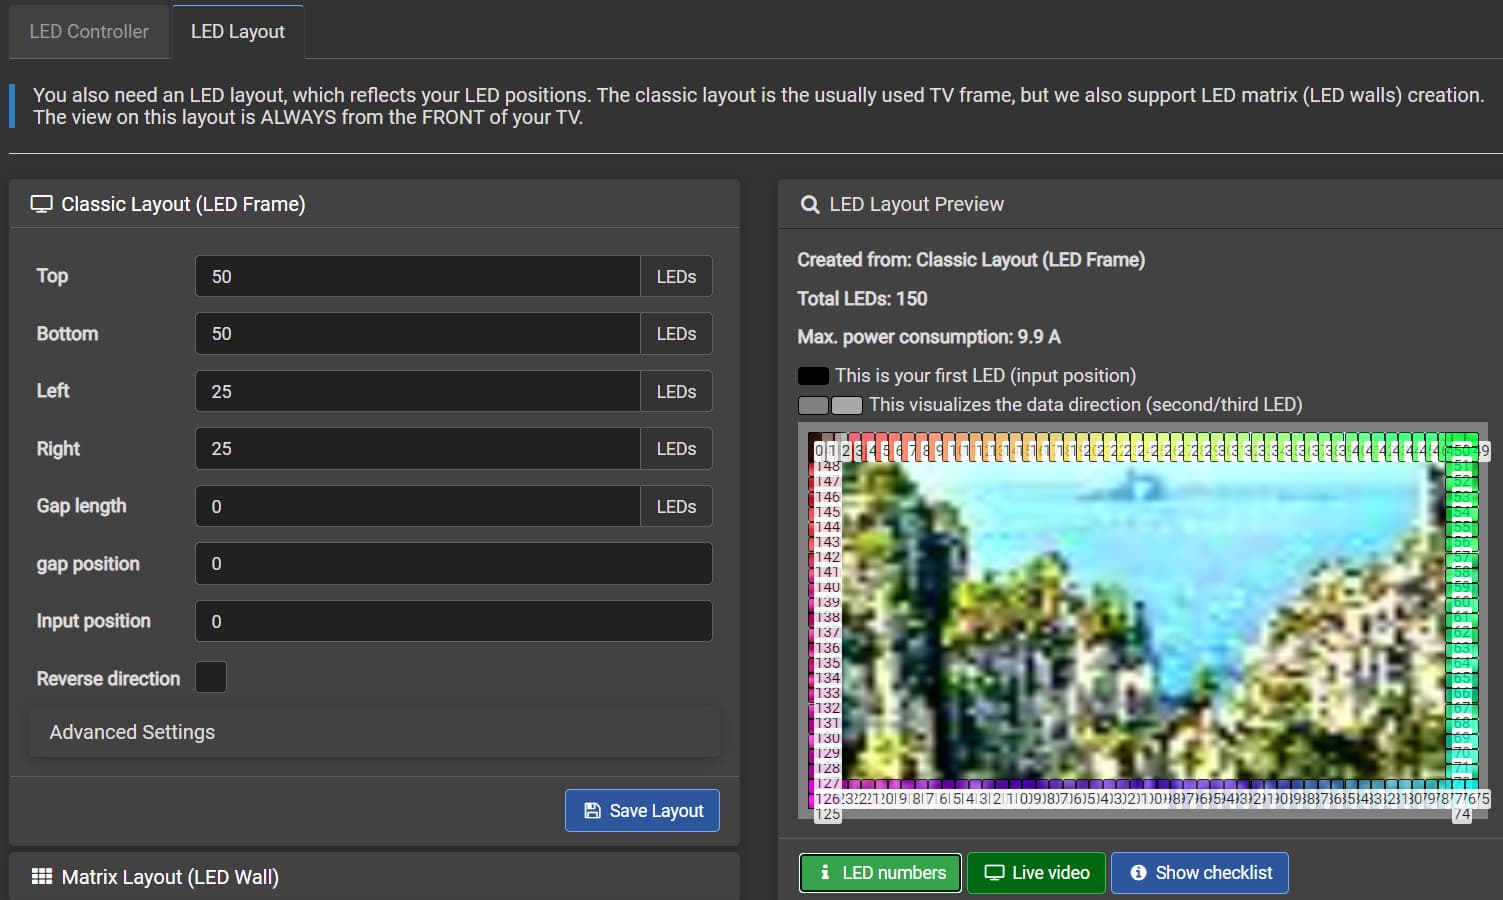
I’m using 60 LEDs per meter strip lights and Hyperion is estimating 7.3 Amps max current use, which is for a full white screen. I’ve changed the maximum brightness setting to be 50% (using a 4 Amp power supply) as they were plenty bright anyway but the current consumption figure on the LED preview doesn’t get updated even though the lights definitely are dimmed and capped at that brightness limit.
Can I ask what HDMI Splitter would get this job done the best with a PS5?
From what I can see with HDMI splitters, there will be a compromise - I’ll lose the 60Hz refresh rate, or I’ll lose 4K resolution.
Which splitter would allow the 4K 60Hz to go to the tv (with HDR), and still send what is needed to the Raspberry Pi without slowing things down?
PS5 are wonderfully outside of my expertise but you are correct, with the current HDMI splitter technology you end up having to make that compromise.
There is another option potentially, the PS5 has a PS Remote Play App which will let you stream a mirror of that output to another screen. You could then send that stream into the Raspberry Pi which will be used by Hyperbian to control the LEDs.
Below is the unofficial support to make PS Remote Play work on a Raspberry Pi 4 Model B.
I hope this helps and would love to see a photo of it working
Thanks for getting back to me.
After a bit of digging I think there may also be another option -
A video capture card that accepts 4K 60hz input and outputs 1080 60hz - I have found one that apparently does this. Would the Raspberry Pi accept this as input? That way I would only need an HDMI splitter that splits the single 4K 60hz input into two separate 4K 60hz outputs.
EDIT - Same company makes one that is 4K 60hz input and 1080 30hz output - seems ideal?
Some places are advertising hdmi splitters with downscaling - but the 1080 output it gives would be the original 60hz anyway.
Nice mate, the Raspberry Pi will definitely accept that as 1080 60Hz input through an HDMI to USB Video Capture Adapter like the one linked. It is also not too important how high the resolution is that goes to the Raspberry Pi as you will be lowering the video capture card output to 720x480 for sharp LED response times.
All these splitters will be lowering your overall resolution away from 4K however. In my quick search around I couldn’t find one that could split one 4k 60hz feed into two 4k 60hz feeds but I’m sure there will be one soon/is one.
I have an issue where the LED strip does not lit up at all. I have a feeling that I might have a dud LED strip; but would you be able to confirm my connections?
What I have done so far:
Confirmed the power adapter is 5V (it’s around 5.10 when I tested it with multimeter)
Stripped and Connected the LED strip red (+) and white (-) cables TO the DC barrel Jack Adapter
Connected the LED white (ground) cable TO the Raspberry pi Ground port using jumper wires
Connected the LED green (data) cable TO the Raspberry pi GPIO18 port using jumper wires
Notice, I didn’t connect the LED red (+) cable TO the Rapsberry Pi; as my power adapter is more than 4 Amps (following your video instructions)
Connected the HDMI capture
Source > HDMI USB Capture > USB input of Raspberry Pi && HDMI out to the monitor (refer to the summary pic below)
Powered up the Raspberry Pi (through a normal micro USB input)
Powered up the HDMI USB capture card (through a normal micro USB cable)
I can detect the HDMI USB video capture and see the live feed video in the hyperbian app, but I cannot see the LED strip to lit up at all
I have tried the following too:
Tried to measured the voltage from the other end of the LED strip cables, and it stated the same (+/- 5.1voltage) - which indicated the power and connectivity is there
Tried to increase the image process brightness to 50% in hyperbian
Only connects the power adapter to the LED Strip (removed the Raspberry pi connections)
I noticed there is an arrow on the LED strip, I suspect I need to connect the power from the source?
E.g. Power Adapter >>> LED STRIP
and not the other way around, something like this: Power Adapter <<< LED Strip
1 = Power input for HDMI USB Video capture (micro USB)
2 = HDMI Source (from computer)
3 = HDMI output (to monitor)
4 = USB output to Raspberry Pi (to 8)
5 = Power input 5V 6A for LED strip
6 = Data (green) and Ground (white) connectors to Raspberry Pi 3B+
7 = Power input for Raspberry Pi (Micro USB)
8 = USB input from HDMI USB Video capture (from 4)
Thanks for the well-documented troubleshooting you have done here, it looks like everything is very close to working. Tim isn’t in the office at the moment but I think I can clarify a couple of your questions.
The WS2812B strip can receive the 5 volts and Ground connections from either end of the strip (or both if you want to minimise the voltage drop across the length of the strip). The arrow on the LED strip refers to the direction of the data pin. The 1 wire input must be fed into the strip so that it “flows” in the direction of the arrow, which I can see you have done.
It seems to me like all your power and signal connections are correct.
One diagnostic thing you can try is to use the preview window in the Hyperbian application to show live video, and show LEDs, so you can see what Hyperbian is trying to output and check that it is definitely configured to send something to your LED strip.
Also, were you using the Hyperbian image, or running the Hyperion service in another OS?
I also checked the Log (I activated verbose); and no error produced by Hyperion.
But, as soon as I enabled debug log, the following is presented: (ERROR) Device disabled, device ‘ws281x’ signals error: ‘Failed to open. Error message: mmap() failed’
2021-09-08T12:17:20.903Z [hyperiond DAEMON] (INFO) CEC handler created
2021-09-08T12:17:20.939Z [hyperiond EFFECTFILES] (INFO) 39 effects loaded from directory :/effects/
2021-09-08T12:17:20.952Z [hyperiond EFFECTFILES] (INFO) 22 effect schemas loaded from directory :/effects/schema/
2021-09-08T12:17:20.954Z [hyperiond EFFECTFILES] (INFO) 0 effects loaded from directory /home/pi/.hyperion/custom-effects/
2021-09-08T12:17:21.816Z [hyperiond DAEMON] (INFO) set screen capture device to 'dispmanx'
2021-09-08T12:17:21.819Z [hyperiond DAEMON] (INFO) DISPMANX frame grabber created
2021-09-08T12:17:21.826Z [hyperiond V4L2] (INFO) Set new frames per second to: 20 fps
2021-09-08T12:17:21.827Z [hyperiond V4L2] (INFO) Set flipmode to NO_CHANGE
2021-09-08T12:17:21.929Z [hyperiond V4L2] (INFO) Started
2021-09-08T12:17:21.937Z [hyperiond JSONSERVER] (INFO) Started on port 19444
2021-09-08T12:17:21.910Z [hyperiond LEDDEVICE] (INFO) Start LedDevice 'ws281x'.
**2021-09-08T12:17:21.914Z [hyperiond LEDDEVICE] (ERROR) Device disabled, device 'ws281x' signals error: 'Failed to open. Error message: mmap() failed'**
2021-09-08T12:17:21.921Z [hyperiond FLATBUFCONN] (INFO) Connecting to Hyperion: 127.0.0.1:19401
2021-09-08T12:17:21.965Z [hyperiond HYPERION] (INFO) Hyperion instance 'First LED Hardware instance' has been started
2021-09-08T12:17:21.957Z [hyperiond FLATBUFSERVER] (INFO) Started on port 19400
2021-09-08T12:17:21.958Z [hyperiond PROTOSERVER] (INFO) Started on port 19445
2021-09-08T12:17:22.065Z [hyperiond WEBSERVER] (INFO) Started on port 8090 name 'Hyperion Webserver'
2021-09-08T12:17:22.759Z [hyperiond WEBSERVER] (INFO) Started on port 8092 name 'Hyperion Webserver'
2021-09-09T01:27:35.483Z [hyperiond LEDDEVICE] (INFO)  Stopped LedDevice 'ws281x'
2021-09-09T01:27:35.485Z [hyperiond LEDDEVICE] (INFO) Start LedDevice 'ws281x'.
2021-09-09T01:27:35.488Z [hyperiond LEDDEVICE] (ERROR) Device disabled, device 'ws281x' signals error: 'Failed to open. Error message: mmap() failed'
2021-09-09T01:37:34.008Z [hyperiond EFFECTENGINE] (INFO) Run effect "My Modded Effect" on channel 1
2021-09-09T01:37:36.380Z [hyperiond EFFECTENGINE] (INFO) effect finished
2021-09-09T01:40:47.232Z [hyperiond WEBSOCKET] (DEBUG) (WebSocketClient.cpp:215:sendClose()) send close: 1000
2021-09-09T01:40:48.105Z [hyperiond WEBSOCKET] (DEBUG) (WebSocketClient.cpp:30:WebSocketClient()) New connection from ::ffff:192.168.1.209
2021-09-09T01:40:48.106Z [hyperiond WEBSOCKET] (DEBUG) (JsonAPI.cpp:122:handleInstanceSwitch()) Client '::ffff:192.168.1.209' switch to Hyperion instance 0
2021-09-09T01:40:49.130Z [hyperiond WEBSOCKET] (DEBUG) (JsonAPI.cpp:1058:handleLoggingCommand()) log streaming activated for client ::ffff:192.168.1.209
Does WS2812B require a data input to be able to turn on at all? as in my case, whether I connected the LED to Raspberry pi or not (just connected to the power adapter); it does not lit up at all.
Heyya mate, I’ve been going through the settings between yours and mine and there does seem to be some differences between the versions.
Everything seems to be in order and absolutely beautiful photographed and asked questions.
This has me curious, can I ask you to turn down the brightness in hyperbian to a very low level (like 5%), remove the usb-c power plug powering the Raspberry Pi 3b+ and then attatch a red power jumper cable between the Raspberry Pi and the LEDs.
If that works then I’ll have a solution for you to make it safely power the Raspberry Pi over an extended amount of time. If not I’ll replicate your set up here and troubleshoot it that way.
And also the WS2812B needs data input to turn on and show any lights*
And unplugged the micro-USB power and use the 5V from the LED instead:
Unfortunately, the LED still not working.
I googled the error presented in the log, seems someone else experienced the same:
Although the resolution provided was to reflash the hyperbian image; which I find does not make any sense; as I used a new hyperbian image for this project…
Do you know how to downgrade hyperbian image to the earlier version? I wanted to try to use the same version you used in the video (2.0.0-alpha 8)
Downgrading definitely seems like a good plan particularly since this seems to be a shared problem. It was also quite challenging to find the earlier releases. But I succeeded, have linked them below.